Need all sorts of help

This site may earn a commission from merchant affiliate
links, including eBay, Amazon, and others.

PatrickRay

Member
Messages
49
Location
Zanesville, Ohio
Hello friends,

I am brand new to the hobby. I bought a Savage x off eBay that had been sitting for awhile. Seller said he got it to run and everything but maybe the clutch was going bad.

This post is going to follow me through my disassemble (which I have already started) cleaning, reassemble, and finally to actually running it. I more or less have no idea what I'm doing except for what I have read in these forums and some basic worldly knowledge. I am going to be asking questions about all parts of the truck which is why I have chosen the general Savage thread.

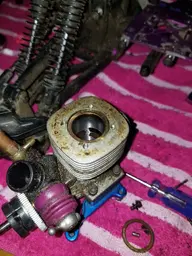
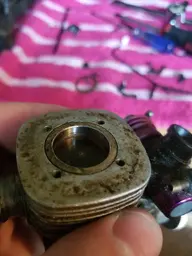
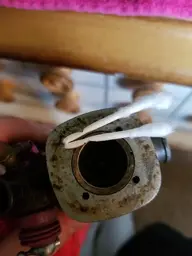
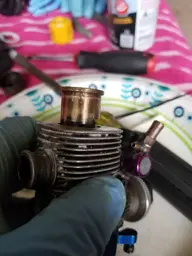
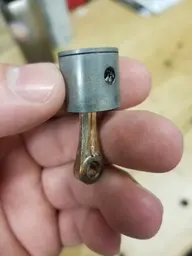
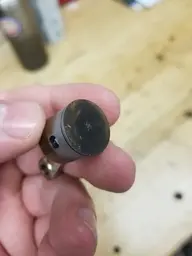
So my first question is, how do you know a clutch is bad? I have my engine off already and am looking at the clutch shoes and everything seems fine to me. The springs still hold them tight to the center. I'll post a picture of it.1529529228773153464424918623138.jpg 15295292538976303180652628071367.jpg
 
Congrats on the purchase! Ask any and all questions you have while going through it.

To start off, what are your goals for this Savage? Is this a budget clean up and run sort of situation? Or are you planning to upgrade and spend a bit of money as you go through it?

Those clutch shoes appear fine. Not major damage, chunks missing. They also have alot of wear left to go. Your wear indicator is the slot that the spring is in. You wear down to the spring and they are most definitively done.

That being said, this is a common wear part. If you have the time and funds, it's not a terrible idea to replace the clutch shoes and springs while you have it apart. This may save you time and trouble in the future.

Thanks for the reply!
As far as my goals, over time i want to upgrade it. I want to get it apart, find out what's wrong with it, get it cleaned, and back to running for now and then after I get a feel for it and the hobby, start playing around. So for now I just want it to run.

This truck came with a few extra parts. I have more shoes and new springs for it but to me the look similar as far as wear goes. Reference pic.

Also, it's really important to me that I clean this because to me it's quite dirty. Even though it's used, I want it to feel new to me. So as far as cleaning goes, is soap and water going to hurt anything that isn't electronic? The engine for instance, if I just start scrubbing and soapy water goes in the cylinder is that a big no no?


Oh and as far as sealing an engine. I have clear rtv 108 made by momentive. It's good up to 400 degrees. Is that okay to use?1529531045616615353861302033492.jpg 15295310664216971223644485451413.jpg 15295310752181646871615194665996.jpg
 
As for the cleaning I prefer to use a solution of denatured alcohol and water to clean my stuff, the alcohol removes the nasty stuff pretty easily, after using an old toothbrush to scrub off the main gunk I spray it down again and use an air compressor to get the rest off, I do the same with my engines but I use straight denatured alcohol to get those cleaned up nicely....

For sealing engines I use the coppercoat rtv for that.....
 
Yeah, the clutch is fine. I'd clean the shoes off with some DA and the inside of the bell with DA to remove any oil. Then I'd use a fine sand paper to rough up the face of the shoes where they contact the bell and the inside of the bell similarly. Also, this is a good time to just replace the bell bearings, only a couple bucks, then you know they are good.

It's also a good time to remove those motor plate screws in the cross braces, get some longer ones, tighten them, then put lock nuts with locktite on the bottom. Those screws like to rattle loose, then you have to remove the entire engine to tighten them back up. I hate those screws.

If he thinks the clutch was bad, just could be that the slipper is slipping. Pull off the spur, clean the pad and plate with DA and rough the slipper pad up with sandpaper as well as the silver washer it presses against. Just make sure to use very very light pressure as the pad is a soft material and sands away easy. They usually slip and glaze up/get shiny, then they are prone to slipping worse.

If you have it completely apart, you can wash the engine with whatever you want, then dry it and oil it as you put it back together. If your not tearing it completely down, keep water out of the carb, glow plug hole and exhaust. I usually plug them with my finger/thumb and leave the glowplug in to plug that hole, then use a toothbrush with dawn dish soap and water to clean it. If I'm tearing completely down, I don't worry much where water gets, I just make sure to dry it before assembly and oil it really well, like the con-rod ends, crank bearings, oneway bearing, etc.

Would also be a great time to seal the engine up:
https://www.hpisavageforum.com/threads/nitro-engine-sealing.15150/

Doing that will ferret out any air leaks it possibly has before you have to fight with them.

I am trying to take it completely apart but, I can't get the sleeve out. It should just slide out right?
 

Attachments

  • 15295332733885895086855330290352.jpg
    15295332733885895086855330290352.jpg
    351.6 KB · Views: 0
how the hell you remove the piston and rod without removing the sleeve first???? now the problem is you have nothing to help remove the sleeve, you can try heating the block with a heatgun or put it in the oven on 220 degrees for a bit to help expand the block a bit, under no circumstance should you pry or use any metal tools to aid in removing the sleeve, if the piston and rod were still in the liner you could insert a ziptie in the exhaust port and rotate the engine to help slide the liner out......
 
how the hell you remove the piston and rod without removing the sleeve first???? now the problem is you have nothing to help remove the sleeve, you can try heating the block with a heatgun or put it in the oven on 220 degrees for a bit to help expand the block a bit, under no circumstance should you pry or use any metal tools to aid in removing the sleeve, if the piston and rod were still in the liner you could insert a ziptie in the exhaust port and rotate the engine to help slide the liner out......
Piston is definitely still in there. It was just at bdc in the pic
 
Put the head of a ziptie in one of the ports, then rotate the crank to push the sleeve up. Don't grab it with pliers. Can also use a q-tip stalk after cutting the end off. You need something that won't damage the piston or sleeve, but is solid enough that it transmits the force of rotating the crank to the sleeve to shove it out. Sometimes you have to heat it, then deal with it with oven mitts on or try to push on the bottom of the sleeve through the backplate hole with a toothbrush handle or something stiff that isn't metal so you don't damage the sleeve or piston if you slip.

It's kind of amusing to see an old engine that was clearly neglected. I have engines that have been in trucks for 5+ years that look nowhere that filthy. The only engines I have that were ever that filthy came in a used vehicle that was also sorely neglected. lol!

I never did it like this, but it would work too:

or this:

I usually would stick the head of the ziptie in one of the ports from inside the sleeve and while holding the zip in place, I'd rotate the crank until the piston pinched it, then while keeping pressure on the flywheel, I'd hold the engine securely and rotate the crank to push it up. Vs running something through the exhaust port like that.
 
Last edited:
Put the head of a ziptie in one of the ports, then rotate the crank to push the sleeve up. Don't grab it with pliers. Can also use a q-tip stalk after cutting the end off. You need something that won't damage the piston or sleeve, but is solid enough that it transmits the force of rotating the crank to the sleeve to shove it out. Sometimes you have to heat it, then deal with it with oven mitts on or try to push on the bottom of the sleeve through the backplate hole with a toothbrush handle or something stiff that isn't metal so you don't damage the sleeve or piston if you slip.

It's kind of amusing to see an old engine that was clearly neglected. I have engines that have been in trucks for 5+ years that look nowhere that filthy. The only engines I have that were ever that filthy came in a used vehicle that was also sorely neglected. lol!

I never did it like this, but it would work too:

or this:

I usually would stick the head of the ziptie in one of the ports from inside the sleeve and while holding the zip in place, I'd rotate the crank until the piston pinched it, then while keeping pressure on the flywheel, I'd hold the engine securely and rotate the crank to push it up. Vs running something through the exhaust port like that.

So far I have only been able to get it flush
 

Attachments

  • 15295364506372431658556339558390.jpg
    15295364506372431658556339558390.jpg
    207.1 KB · Views: 0
You rotated the piston to the bottom, put a ziptie head in one of the sleeve ports, then rotate the crank to push the piston up against the ziptie? Is it just cutting them? If so, try a q-tip stalk folded in the exhaust port. The compressed/wrapped paper should be pretty solid but still safe on the piston/sleeve surface.
 
You rotated the piston to the bottom, put a ziptie head in one of the sleeve ports, then rotate the crank to push the piston up against the ziptie? Is it just cutting them? If so, try a q-tip stalk folded in the exhaust port. The compressed/wrapped paper should be pretty solid but still safe on the piston/sleeve surface.

Yeah I did. It started crushing the heads too. Since I'm cleaning it anyway how about a poop load of liquid wrench?
 
Probably going to have to heat it to get it to let go. To be honest... you really don't have to take that apart to clean it. Just wash everything really well, shake it dry, use compressed air to dry further, then put oil on the rear bearing, a little in the hole the carb goes in and on the con-rod bottom and top. Can get it on the conrod top by turning the engine upside down and putting a few drops on the conrod then letting it flow to the piston.
 
Probably going to have to heat it to get it to let go. To be honest... you really don't have to take that apart to clean it. Just wash everything really well, shake it dry, use compressed air to dry further, then put oil on the rear bearing, a little in the hole the carb goes in and on the con-rod bottom and top. Can get it on the conrod top by turning the engine upside down and putting a few drops on the conrod then letting it flow to the piston.

Okay. When I get home today I'll spray it with some liquid wrench and let it sit a bit and give it one more try but if it doesn't work ill just do that. Part of the issue is that the two stage air filter became a one stage at some point in time. So I'm assuming that's why it looks as bad as it does. It started sucking filter particles into the engine which then burned and started coating everything. that's why I want to get it apart so bad20180620_160457.jpg
 
Okay. When I get home today I'll spray it with some liquid wrench and let it sit a bit and give it one more try but if it doesn't work ill just do that. Part of the issue is that the two stage air filter became a one stage at some point in time. So I'm assuming that's why it looks as bad as it does. It started sucking filter particles into the engine which then burned and started coating everything. that's why I want to get it apart so badView attachment 5261

Wow, that might be the worst looking filter setup I've seen. No wonder you want to completely gut and clean that engine. I would too!

Hopefully the engine is revivable!
 
Wow, that might be the worst looking filter setup I've seen. No wonder you want to completely gut and clean that engine. I would too!

Hopefully the engine is revivable!

I hope so too or she won't be running any time soon.
I was planning on getting a k&n crank case filter as a replacement. Part number 62-2480
 
I hope so too or she won't be running any time soon.
I was planning on getting a k&n crank case filter as a replacement. Part number 62-2480


I would not recommend using that K&N filter to run the engine with, the filter lets in alot of small particles and that will cause wear very fast, if you insist on using it at least put a foam oiled sleeve over it to help filter out smaller particles.....
 
I would not recommend using that K&N filter to run the engine with, the filter lets in alot of small particles and that will cause wear very fast, if you insist on using it at least put a foam oiled sleeve over it to help filter out smaller particles.....
I wanted it mostly for aesthetics. How about this one?
Check this out at Amazon.com
Integy RC Model Hop-ups T7081BLACK High Flow Air Filter for HPI Savage-X, 21 & 25 https://www.amazon.com/dp/B000F2HX0I/ref=cm_sw_r_other_apa_h78kBbNBQ4QSM
 
There is a vendor here named Motor Saver, check out their filters on E Bay and other retailers, also keep in mind you have to clean and reoil every few runs depending on how dirty your environment is where you play at..... I have a can of K&N air filter oil I use to oil my prefilters with, put it in a baggie spray some oil in and work it around for a bit to spread the oil....

http://www.motorsaverfilters.com/
Okay thanks
 
Holy fiddlesticks boyos. My hands hurt. Here is my current progress.

The scratch marks were basically a necessity. I had to use two q tips both folded over and a lot of lube to get it so that I could get a screw driver under the lip to lift it up more. It's really in there though. It's stuck where it is again and I can't turn it or anyrhing. I'm going to spray more lube and tap it back in a little and try again.
 

Attachments

  • 15296139211964862325865719152901.jpg
    15296139211964862325865719152901.jpg
    206.4 KB · Views: 0
Alrighty then. So I'm still trying to get this cylinder out. Going to bring it to work and try a few things since I have more tools there.

I went ahead and bought a new cylinder and piston set though because I found one made by hpi, still in the packaging for only 35 bucks. That'll be here next week. The current one is probably toast anyway
 
Probably going to have to heat it to get it to let go. To be honest... you really don't have to take that apart to clean it. Just wash everything really well, shake it dry, use compressed air to dry further, then put oil on the rear bearing, a little in the hole the carb goes in and on the con-rod bottom and top. Can get it on the conrod top by turning the engine upside down and putting a few drops on the conrod then letting it flow to the piston.

Alright I finally got the cylinder out. Scale from 1 to 10 how does it look? Also, is there supposed to be a compression ring on this? How else would it build pressure? Because when I took it out there wasn't one.
 

Attachments

  • 20180622_060601.jpg
    20180622_060601.jpg
    148.4 KB · Views: 0
  • 20180622_060611.jpg
    20180622_060611.jpg
    124.4 KB · Views: 0
Wow, that might be the worst looking filter setup I've seen. No wonder you want to completely gut and clean that engine. I would too!

Hopefully the engine is revivable!

How do you remove the carb? I know it has the pinch screw. But after thats out do you just pull it out?
 
How do you remove the carb? I know it has the pinch screw. But after thats out do you just pull it out?

Did you remove the carb lock as well as the screw?

Looks something like this: upload_2018-6-22_10-34-50.png

Is so, just twist the carb back and forth until it pops off, they can be stubborn sometimes.
 

Latest posts

Members online

No members online now.
Back
Top