Savage 3 piece clutch conversion

This site may earn a commission from merchant affiliate
links, including eBay, Amazon, and others.
Messages
14
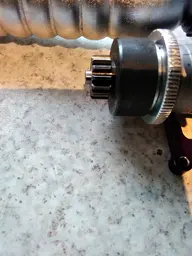
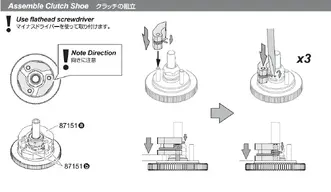
Hi all i am doing a clutch conversion from 2 to 3 piece on my savage 21 and my problem is the new flywheel will not go back on the collet as far as the old flywheel did so when its fully assembled the bell housing will not spin freely. Any help much appreciated
 
Put some shims (washers) between the clutch bell and the flywheel nut.
 
Does the clutchbell lock up when you tighten the bolt that threads in to the end of the crank ? Take a pic of the tip of the crank with the clutchbell installed but with the bolt removed.
 
Does the clutchbell lock up when you tighten the bolt that threads in to the end of the crank ? Take a pic of the tip of the crank with the clutchbell installed but with the bolt removed.
Yes mate it does lock up
 

Attachments

  • IMG_2021-07-12-18-34-50-924.jpg
    IMG_2021-07-12-18-34-50-924.jpg
    277.7 KB · Views: 5
@jonnybravo2667

THE MESURMENT IS THE DIAMETER,
FROM EDGE TO EDGE,
ALSO TAKE THE CLUTCH BELL OFF AND TAKE A LOOK AT HOW YOUR CLUTCH
SHOES ARE INSTALLED .

1626137122634.png
 

Attachments

  • SAVAGE CLUTCH SHOE INSTALL.JPG
    SAVAGE CLUTCH SHOE INSTALL.JPG
    91 KB · Views: 3
Are you using the stock savage brass spacer on the end of the crankshaft ?sorry i not replied earlier

Are you using the stock savage brass spacer on the end of the crankshaft ?
Sorry i not replied earlier mate i been waiting on parts, Bought a new flywheel new securing nut new bearings and new spacer to replace the brass one that you mentioned. the new spacer is slightly thinner and i can tighten it right down and it turns with a little resistance. Think if you tighten it right down the bell housing rubs on the clutch but slacken it half a turn it spins freely. I also don't think the flywheel goes down far enough on the collet but the nut is really tight down
 
Last edited:
Get some 320 grit sandpaper and lay it on flat surface. sand one side of the spacer to remove thickness until you have a small amount of free play in the spacer with the crank bolt tight.
 
Get some 320 grit sandpaper and lay it on flat surface. sand one side of the spacer to remove thickness until you have a small amount of free play in the spacer with the crank bolt tight.
cheers mate will give it a whirl
 

Latest posts

Members online

No members online now.
Back
Top