Project FG

This site may earn a commission from merchant affiliate
links, including eBay, Amazon, and others.

orcusomega

Well-Known Member
Messages
653
Location
Royersford, PA
Well, I picked up my first Savage, and thought I would document its rebirth, hopefully this will help other Savage Newbies (like myself)!

Here is what she looked like when I get it home

240.JPG

241.JPG


And here is what she looks like now:

tear-down.jpg


I picked up a Futaba 195oz steering servo, XL diffs, and a ton of goodies, I will put up pics as soon as I get the parts.

The first thing I did do, though, was swap out the throttle linkage (thanks Pope!)
G_Photo_2.jpg


This is what my truck looked like heading to bash with Pope!
G_Photo_1.jpg


More to come!

Bob
 
Ok - sorry for the late reply - was runnin out of time on the first post.

So, I now have three Savages in the stable - two Savage 21's and a 25. The pics in the first post are the first Savage 21 - when I got that, I immediately sold my T-Maxx to buy more Savages 🙂 These are going to Larry, Moe, and Curly 🙂

Larry: Savage 21, OFNA .21, steel spur, high torque steering servo - Going to be my son's.
Moe: the other Savage 21 - this one has a HPI 4.6HO in it, and will be converted into my basher. I have ordered an XL TVP, two XL diffs/dogbones/outers, as well as a few other goodies. Goal is to go FAST bash HARD.
Curly: Savage 25, STS.28 on board. The goofy one of the bunch. I have a 5.2" TVP stretch waiting to go in, then I am converting it to 1/5 scale 🙂 Why? Just because i always wanted a larger scale RC, and this is the cheapest way to make that happen 🙂 Stretch it out, put Series 40 tires on it, and a 1/5 HPI baja truck body on it and wala 🙂

Here are the two new ones (Moe has the orange springs, Curly has the black ones)
G_Photo_3.jpg


Now I need a bigger work bench, i cant have all these cars under construction at once!

Today I got one of the XL diffs in, so I pulled the back half off Moe and transplanted it onto Larry (bad rear diff on Larry) and put him back together 🙂 Then I broke down the rear and rebuilt it all nice and clean (even scrubbed the parts in the sink). Have it all ready to go back into Moe, but waiting on more parts (the other diff, and the outer axles).

In the process I lost what has to be the most RIDICULOUS part - the stupid little shaft that holds the hex nut on - gonna have to make one because I am not driving to the hobby store for one of those!

Anyways, more pics coming, will have some time this weekend to spin some wrenches...

Bob
 
If you have some old drill bit's, just cut the end off of one, drill stalk is tough and should last longer then the stock ones, forever lol.
 
Looking good Bob. XL axles are 1/2 inch extended couple that with 1/2" offset rims and you will be 2 inches wider. That should be good. your stock gearing is 15/49 that is plenty low enough with the sts .28
 
Last edited by a moderator:
More poking around and planning last night - Here is the body I am going to use:

7564.jpg


I am going to not use the HPI decals, I am going to make this look like the Jesse James Baja Truck
PIC-0109_detail.jpg


LOL my 5-yr old is taking over the laptop, so I will be back shortly!

Bob
 
AHH GOT YA. I have never ordered from them before, I thought that the price was $68 for a set of two - not $34 for a set of 2 - BIG difference. I just need to find the rims - 17mm or 24mm? Do you know?

Bob
 
Moe Lives!

Well I have spent the last few days workin my tail off on Moe - and it finally paid off!
G_Photo_9.jpg

HPI 4.6HP, XL TVP's, XL diff's and bulkheads f/r, XL axles, Flux outers, steel spur gear, Ofna throttle linkage mod - all done in about a week 🙂

More to come, I just got the last of the suspension tweaks done last night, so I will have her out for a 2nd shakedown run tonight/tomorrow.

Bob
 
Well today I started the first steps in the tank relocation, by moving the revceiver and battery to the back. This is also posted in the How-To section, but wanted to add it here too:

=======================================
OK, few caveats:

1) This is my first how-to, so be gentle 🙂
2) My truck is a Savage 25 with the XL TVP's - this gives me the room to move the battery box behind the motor - so I don't know if it will work for everyone
3) Where the battery is mounted will block your access it you use a roto-start - just keep that in mind.

So this is how I moved my receiver and battery from the front of the truck to the rear, in preparation for a mid-tank mod coming soon. My mission was to do it as cheap as I could using crap I had lying around as much as possible.

Parts List:
1) 2 aluminum bulkhead braces
2) 2 servo wire extensions
3) one T-Maxx battery box
4) one motor mount brace
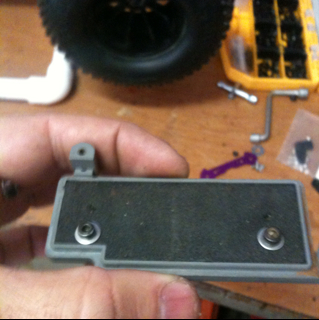
5) one receiver box (Traxxas #4924 - no idea what it is out of)

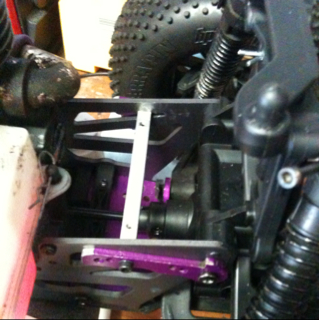
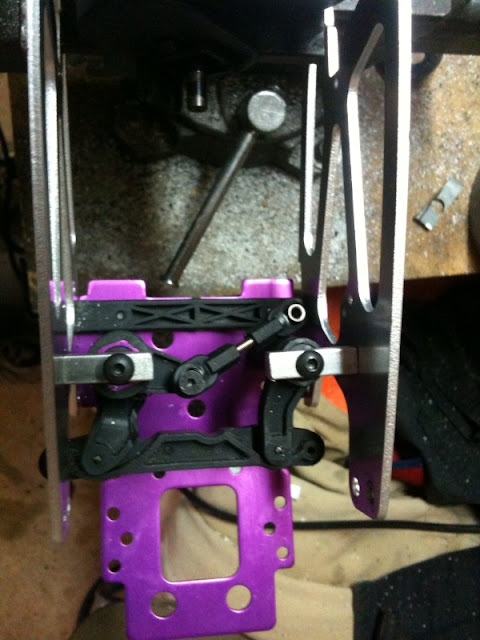
To start things off, I needed to figure out how to mount a horizontal brace from TVP to TVP without drilling - I did not want to weaken the TVP at all, and it seemed there HAD to be a way to make this work.

When I lined up the brace between the TVP's, I saw that the spaces cut out where different from side to side, so I had to find a place on each side where they were the same. Once I did that, it should be a matter of putting something there to hold it in place - right?

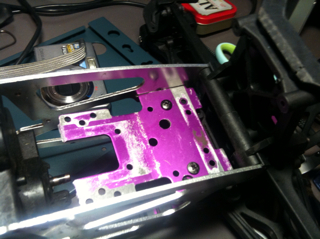
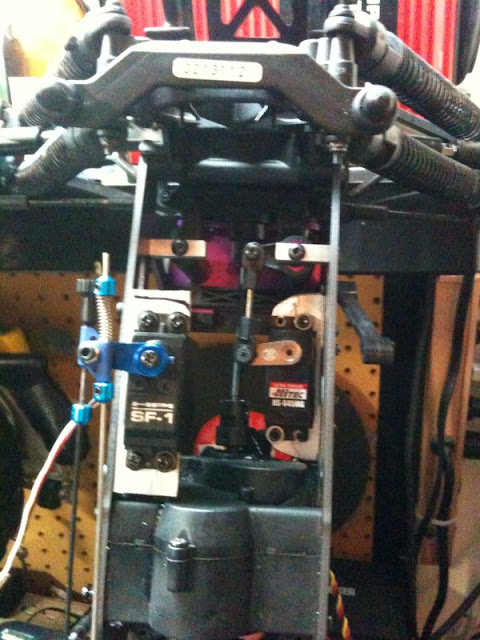
After I found a place on both sides of the TVP's where I could attach the brace and keep it even, I needed a way to keep it from moving around too much - I happened to have a few diff braces lying around from my XL diff conversion, and I used them to hold the brace in place front to rear. All put together, it looks like this:

G_Photo_17.jpg


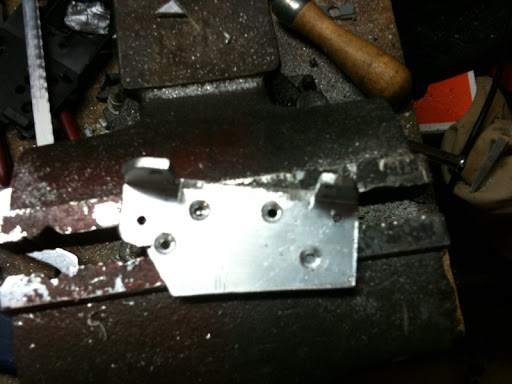
You will notice that the brace is significantly below the top rail of the TVP, and so did I, especially when I looked at how wide the T-Maxx battery box was, but it worked out perfect. I drilled a few holes in the bottom of the battery box to line up with the holes in the mount, and the flat bottom of the box keeps it in place well (just remember to use locktite on all screws where metal is on metal).

G_Photo_18.jpg


Put together, it looks like this:

G_Photo_19.jpg


Why a T-Maxx battery box, when there are so many other ones that are smaller? Well, I like the T-Maxx batt box because it holds everything, including a port on the top with a rubber plug that you use to recharge the battery pack. When you are done, pop the plug back in and there is no leakage of water, etc.

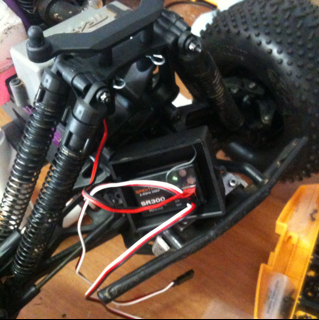
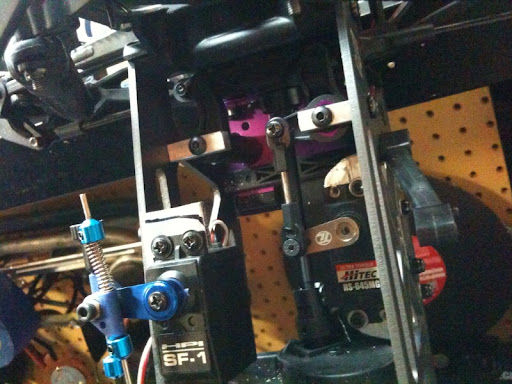
So now I have the battery moved, but I still need to move the receiver. This is where the Traxxas radio box comes in. Since my LHS pretty much carries only Traxxas and Losi, shopping the rack for parts is hit-or-miss, but this worked out well. I just toolk my spektrum receiver, velcro'ed it to the top of the case, routed the wires for the battery and servo.

G_Photo_20.jpg


I spent a bunch of time trying to figure out how to mount the box to the back, but decided on zip-ties - cheap, easy, and doesn't require me to drill holes or fab up crazy brackets.

The finished product (still need to tuck wires)

G_Photo_21.jpg


Hope this helps someone!

Bob
 
Last edited by a moderator:
Busy busy busy!

Between last night and today, I completely tore down my Savage 21-turned-XL and my son's Savage 25, all the way down to the TVP's, and rebuilt, cleaned, adjusted everything except the trans and diffs:

  1. Clearanced the steering on both trucks
  2. Cleaned\adjusted the steering, toe, and caster
  3. upgraded steering to the servo-saver setup (instead of the servo-mounted setups)
  4. cleaned\adjusted brakes
  5. installed\tweaked metal spur gears
  6. readjusted all the linkages
  7. replaced the pull start on the 4.6HO
  8. rebuilt the back-end of the 25. Previous owner had hacked the hell out of the rear shock tower and bulkhead for the rotostart on the STS 28
  9. Removed the STS from the 25 and put the .21 back in - I need the STS for my 1/5 conversion.
  10. Washed\scrubbed pretty much every part on the damn trucks to get all the crap off so I can see things from now on 🙂

Good news is everything is now pretty much new 🙂 Just need to get the engines re-tuned, and life will be GOOD.

Just thought I would share!

Bob
 
Tuning is the less time consuming part. Since I had the time to sit down and go through everything, I took advantage of it. Not to mention the fact that my neighbors would not be happy with me running the trucks at 2am and we had monsoon rains today..

Good news is I found a pull starter for the STS, should be here in time for the bash - i got that tuned on Alex's truck, but swapped that out today for the Ofna .21 - so once the carb gets here for that I need to tune that LOL. Heheheh I guess now that I think of it I have 1 engine that I can start, but isn't tuned, one engine that is tuned but I can't start, and one that isn't tuned and I can't start (.21 needs carb)

Damn, I better get to work. Tomorrow I am taking out my Savage and will get that tuned, and hope to have both trucks (mine and Alex's) ready for the 7th so I can run both of them...

Bob
 
Love the 1/5th mate, looks like a savvy limo lol and job well done on the Rx/battery relocation on the XL. (sorry forgot their names lol)
 
Mid-Tank Mod - Post #1

OK, next project, now that I have the battery box and receiver relocated is going to be converting it to a mid-tank, again on the cheap. I took some measurements, and the OEM radio box is roughly 2 7/8" wide by 5" long, and the mounting holes are NOT even - there is a pretty decent rise between the front radio mounting hole in the TVP and the rear hole - something that is solved with the FLM TVP's and their servo plate, but I want to make my own. and make it to work on any TVP that uses the standard radio box. I know FLM makes a nice unit - those that have them LOVE them - but I can't justify the expense of everything, especially waiting for them to be in stock... so I am going to scrounge together quality parts, and put together what I hope will be an awesome setup that will not only hold the OFNA 1/7 scale 250cc tank, but also provide additional reinforcement for the tank, etc.

So, first thing I had to do was take the measurements - and they came up as 2 7/8" wide by 5" long. When at the local hardware store, i went looking for aluminum plate, but all they had was crap - nothing I could really use. I did some digging online and found OnlineMetals.com - and they have a great process. Pick the metal (I picked 6061 Aluminum plate), specify the dimensions and number of pieces you need, and they cut them and ship them. As a point of comparison, the FLM servo plate is $14.00 + shipping for one plate. Admittedly, it is all cut out and drilled, but I don't need all that for what I am doing. What did I pay? Including shipping, I paid about $25 - FOR 5 PIECES 🙂 Why 5? I have 3 Savages -and I am going to experiment with making a top-plate to hold the tank more stable when being bashed - apparently folks are having issues where the 250cc tanks can't take the abuse. So I am thinking of taking a piece of paper, cutting it to fit just over the top seam of the tank, and making a top plate - but we will see how that works out in the end 🙂 Of course, when it came time to place the order for the plates, I ordered 3 7/8 and not 2 7/8, so the price is likely to be less (and now I need to cut 1" off the side LOL)

OK, so here's the running parts list so far:
1) 1"x1"x4' aluminum angle iron (Lowes) $3.00
2) 2 7/8" x 5" x2.5mm 6061 aluminum plate - $6.00
3) Two Ofna 250cc tanks (one spare for now) - $15/ea

This weekend I will be working on more of the specifics - so I will post them when it is all gathered!

Bob
 
Last edited by a moderator:
Build continued last night, even though I don't have all the materials 🙂

I scrounged through my ever-growing box of parts and was able to put together most of a Savvy out of spare parts so that I could start mocking up what goes where.

I used an old aluminum bulkhead plate to start lining up where the braces, etc will go and I found I have a lot more room than I thought I was going to have

G_Photo_13.jpg


I am pretty sure that means I am doing something wrong 🙂 I also don't like the location of my relocated reciever case, so I will be making a new servo case out of aluminum angle and using Durafix to weld it together (with a lid, so I can remove the receiver, BTW). That will be in another post 🙂

So, after I lined up the aluminum skid with the steering towers, I realized that there were a few other locations I would be able to use to add extra bracing, as well as having a bunch of space under the plate along the inside of the TVP - this is where the custom receiver box will go.

I also bought more materials today. When I was going through my box of screws I found I was short a bunch, and since I have another build project coming for a buddy of mine, I figured a trip to Lowes was in order again. While there I got the larger machine screws (TVP cross braces, steering, etc, as well as the coarse thread for plastic as well). Again, more detail to come. Suffice it to say I was able to get 100 of just about every type of screw on the Savage for about $20 - much cheaper than the screw kits they sell on eBay 🙂

I will post the sizes, and whatnot when I get back to the house.

Bob
 
So last night I put more time into the mid-tank mod, and I am 99% of the way there - just waiting on more parts!

The purpose of this update is to remove the radio box, relocate the servos in preparation for the arrival of my aluminum and 250cc fuel tank.

The first thing I did was grab an old set of TVP's, bulkhead, and trans to start mocking up the fitting, etc. After trying to figure it all out, and in doing so, keeping the angles on the steering rod so that they won't bind, I found a space was in order. To do this, I took an old engine mount brace, drilled it out for the M4 screws, and cut out the middle section. This allows me to provide the lateral support for the bellcranks, but still have room for the steering rod in the middle.
steering_conversion1.jpg


Now, I had to make a way to mount the servo to the side of the TVP, and consider the pattern of the TVP and how it will interfere with the mounting options. Since I am using an XL fram, the big X on the side limits where I can drill out for solid mount points. In the end, I needed to create the mount (made from 1x1 aluminum angle) and add counter-sunk screw holes so that the servo and screws would not interfere with each other.

steering_conversion2.jpg


Once that was done, I needed to make another mount for my throttle servo. Remember, I mentioned that this is getting ready for the mid-tank, and I don't yet have the aluminum plate or the tank. So, what I did is use another piece of aluminum angle, and make another mount to hold the throttle servo until the rest of my goodies get here. When they do, this servo will be relocated to where the stock fuel tank goes.

steering_conversion3.jpg


Linkages need to be tweaked a bit and I will be getting a more sturdy steering rod at the LHS, but this is what she looks like - let me know what you think!

steering_conversion4.jpg


Total cost of this part of the project (mid-tank mod) to date:

1) radio box (~$5)
2) two servo wire extensions ($3/ea)
3) 3' 1x1x1/8 aluminum angle - $2
misc screws and crap I had lying around.

Comments welcome!

Thanks,

Bob
 
okay here are a few issues I notice right away. Mount the steering servo lower on the tvp's so that the linkage mounts to the bottom of the bellcrack. This will enable you to use a brace all the way across the truck instead of two half braces that are going to move on you. You also need the rubber spacers on your servo's which would make your steering servo even higher. You are going to have your servo hitting on the bottom of your mid tank plate once you put those on. Also you may want to consider a somewhat better T/B servo nothing crazy just a little faster and stronger. Those sf1 glitch a lot.

other than that nice work, great custom work as well.
 

Latest posts

Members online

No members online now.
Back
Top