Wow. I am so glad I let my hobby shop talk me into moving to 1/8 and the Savage. It's well worth my wife's ire over the price tag. And I'm only running 4s. I can't imagine 6s!
In the 80s I had a Kyosho Big Brute that I loved except for the axels that would spin themselves bald if you looked at them funny. Ultimately it slid out of an icy parking lot onto a normally empty road and got run over by a car 🙁 Even with it's chassis cracked in half and only the wiring holding the two pieces together, it still drove back into the parking lot!
In the late 90s I bought an RC10B2 and played with it a bit. Then it got put away and I forgot I even had it until earlier this year. My wife stumbled over it while cleaning and my two year old son immediately took a shine to it. The only problems were the old batteries only lasted about 5 minutes and one of the batteries in the remote leaked. My son loved sitting in my lap while I drove it so I got a new 5000mah battery for it which woke it up like I never remember. Of course then stuff started failing and we all know how getting parts for old cars can be 😉
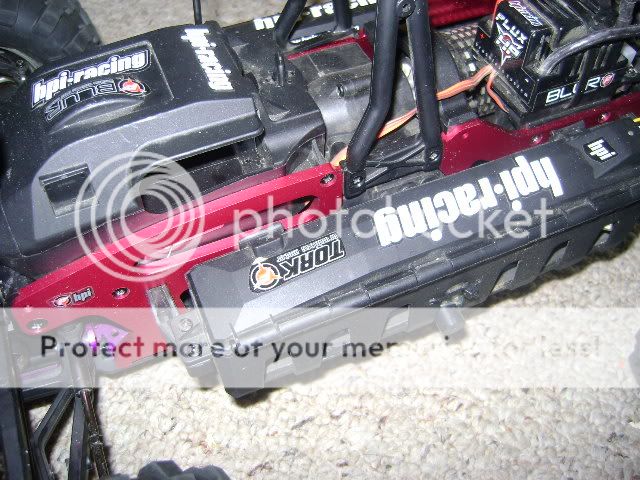
That of course got me in and out of the hobby shop and talking to them to learn about all the new tech that's come out and that led me to HPI (ok, technically it was searching for Porsche bodies that did that 😳). I was looking at the Bullet, but it was the car guys at the shop that have Nitro Savages that talked them up and got me to step up to 1/8 and go back to my monster truck roots (just not a buggy/truggy fan). I picked it up with 2 35c 8000mah LiPos. I also went back and got some Proline body clips that go on and off much better.
I'm been playing with it around the house and it's power is actually a bit much (I need to detune the throttle response for my use), but Sunday I found a school under construction with a 7+ foot high pile of gravel that really showed me what this thing can do 😱
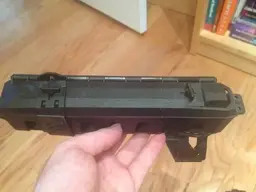
Something I would like to fix, however, is the battery boxes. These batteries fill the width of the boxes entirely (maybe even warp them slightly) and because the covers don't lift entirely vertical they can be hard to get in and out for charging. Does anyone have any tricks to allow the battery covers to open completely?
Thanks in advance.
In the 80s I had a Kyosho Big Brute that I loved except for the axels that would spin themselves bald if you looked at them funny. Ultimately it slid out of an icy parking lot onto a normally empty road and got run over by a car 🙁 Even with it's chassis cracked in half and only the wiring holding the two pieces together, it still drove back into the parking lot!
In the late 90s I bought an RC10B2 and played with it a bit. Then it got put away and I forgot I even had it until earlier this year. My wife stumbled over it while cleaning and my two year old son immediately took a shine to it. The only problems were the old batteries only lasted about 5 minutes and one of the batteries in the remote leaked. My son loved sitting in my lap while I drove it so I got a new 5000mah battery for it which woke it up like I never remember. Of course then stuff started failing and we all know how getting parts for old cars can be 😉
That of course got me in and out of the hobby shop and talking to them to learn about all the new tech that's come out and that led me to HPI (ok, technically it was searching for Porsche bodies that did that 😳). I was looking at the Bullet, but it was the car guys at the shop that have Nitro Savages that talked them up and got me to step up to 1/8 and go back to my monster truck roots (just not a buggy/truggy fan). I picked it up with 2 35c 8000mah LiPos. I also went back and got some Proline body clips that go on and off much better.
I'm been playing with it around the house and it's power is actually a bit much (I need to detune the throttle response for my use), but Sunday I found a school under construction with a 7+ foot high pile of gravel that really showed me what this thing can do 😱
Something I would like to fix, however, is the battery boxes. These batteries fill the width of the boxes entirely (maybe even warp them slightly) and because the covers don't lift entirely vertical they can be hard to get in and out for charging. Does anyone have any tricks to allow the battery covers to open completely?
Thanks in advance.

.webp")