Wolverine
Member
- Messages
- 23
- Location
- Powers, MI
I finally got my Savage 25 Mid Tanked. I wanted the longer run time, no half tank lean, and better weight positioning. So I went with the Ofna 250cc tank. I have FLM stock length TVPs on my truck, but I think this setup would work on the factory standard length TVP. You would just need to add a plate for the rear mounted Throttle Servo. Correct me if i am wrong guys...
I will try to list what I did in a process order, so anyone else who tries this doesn't run into a couple problems I did.
Here we go...
First I removed the standard radio box, tank, and all servos.
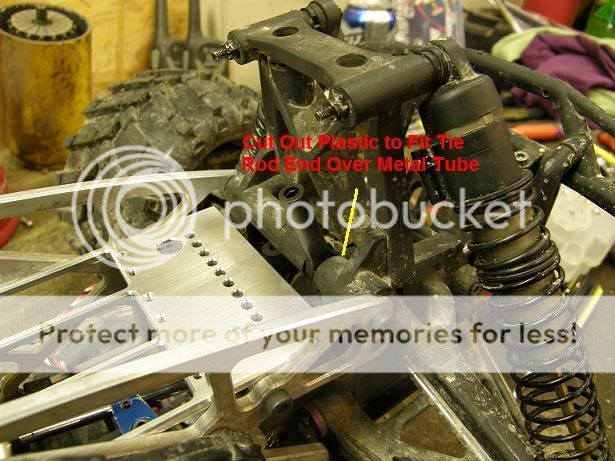
For the front mounting spot for the Ofna 250cc tank I adapted BaddaszSavages tie rod end idea.
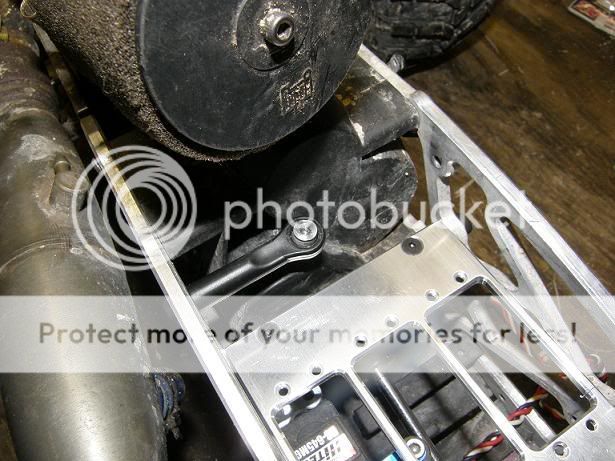
I cut a standard length HPI tie rod end down to 1 5/8in in length. I then removed the plastic from around the upper horizontal TVP brace that has the solid tube in it on upper part of the bulk head assembly. For this mounting, you need to cut a 3/16in slot, 5/8in in from the exhaust side of the bulk head assembly. Make sure you keep the piece that is left after your cut. After you have the slot cut, slide the metal solid brace tube through from the exhaust side on the bulk head assembly. Then slide on the cut down tie rod end, then the left over plastic, and then slide on the other side of the bulk head.
Here it is finished and reinstalled on truck
Also for this mid tank mod, I used a Hellfire battery box, which i mounted to the front shock tower. I opted to drill and screw it to shock tower. Now for me I have stock Savage 25 shock towers, so I had enough plastic to drill through for screws and nuts. You will need to look at your shock tower that you have if it is different and mount it accordingly.
If you wish to do the same then mounting the box is the next step before moving on.
Here is a shot of my box mounted, if you guys want I can take more in depth shots

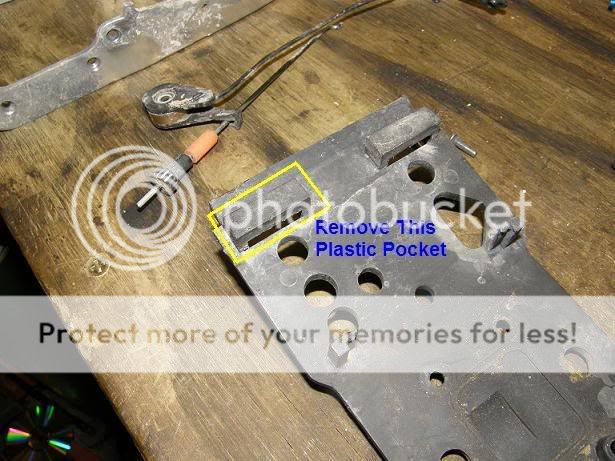
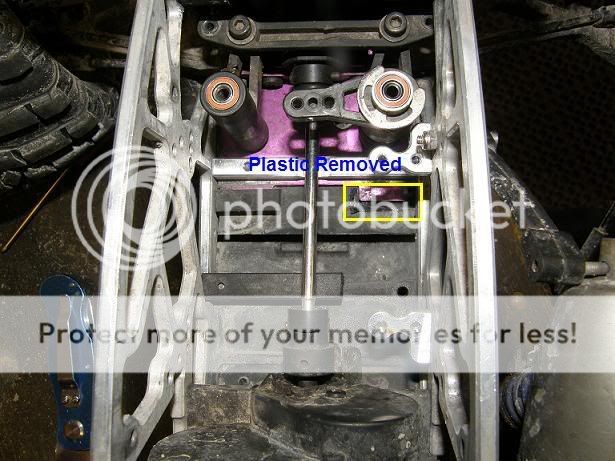
Now to be able to mount the steering servo under the tank and servo mounts I had to remove a little plastic from the stock skid plate to allow for clearance.
Here is the piece to be removed
Top view after being reassembled
Then I mounted the servo mounts for the steering servo
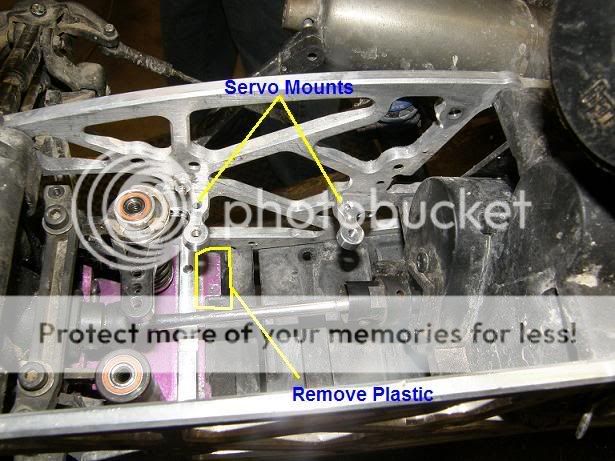
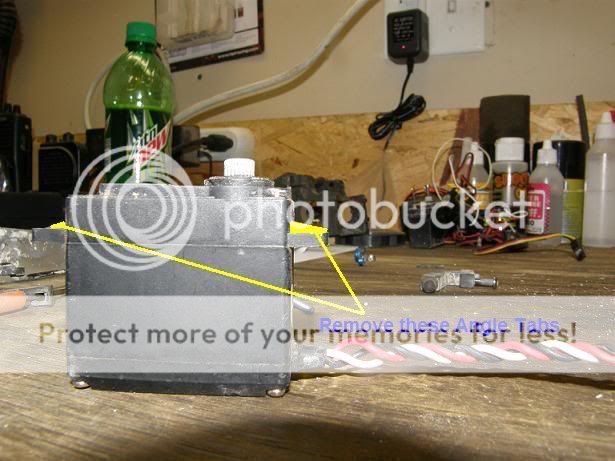
For the steering servo to clear it had to be mounted on the bottom side of the servo mounts, so I had to remove the small plastic angles on the Hitec Servo, so it would fit flush against the mounts.
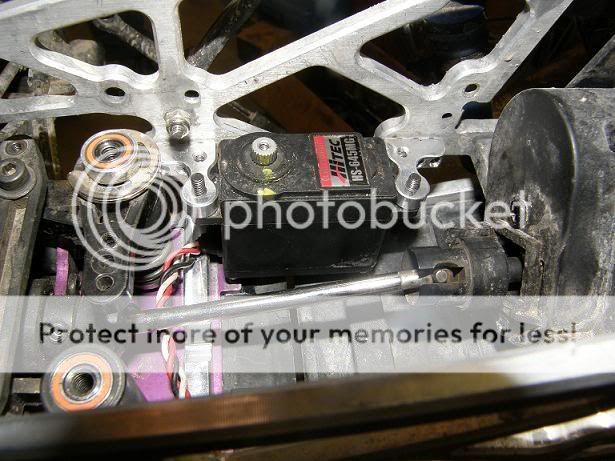
Mounted steering servo
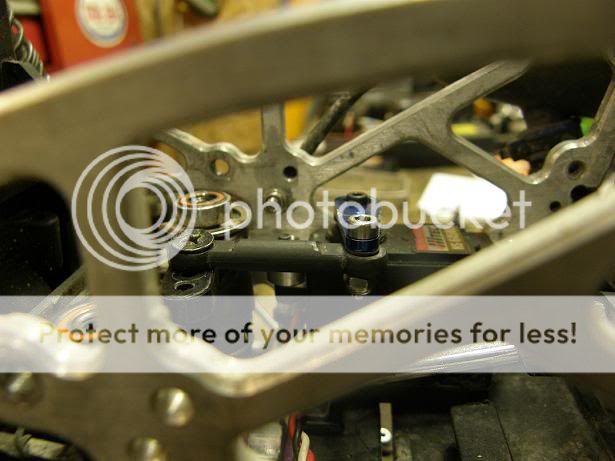
Next I hooked up the steering linkage

It worked out rather nice for the angle on the linkage
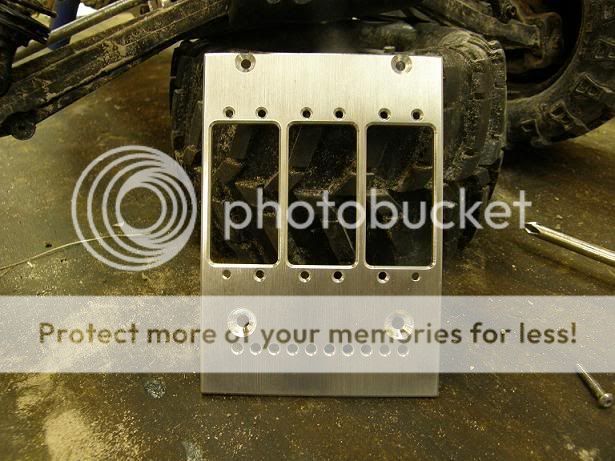
Now for those not using the Ofna 250cc tank and need a different mounting setup for the tank you want. This is how I mounted the FLM servo plate.
The length of the FLM servo plate is to long for the stock length opening upfront, because the transmission hits the plate. So cutting down the plate is needed, for this I was lucky and got to use Wrenchmans CNC milling machine. The plate was needed to be cut down up to the countersunk rear mount holes.
This was the first time the milling machine was used for milling metal since he got it setup. Worked out great.
Here is a short clip of it in action, sorry no sound.
http://s196.photobucket.com/albums/aa215/goodolwolverine/Mid Tank/?action=view¤t=P3060372.flv
Here is the finished product
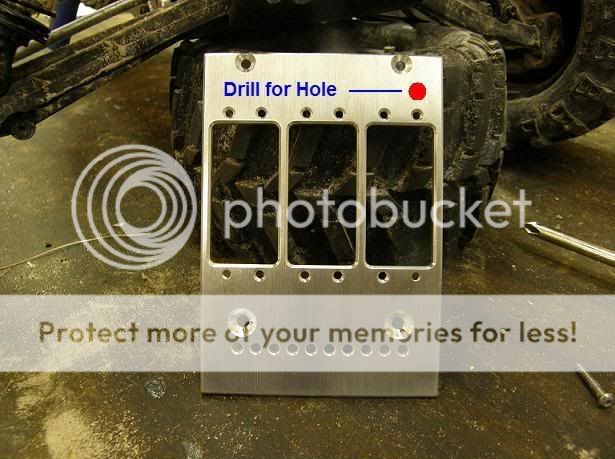
I am using the Racers Edge aluminum antenna mount kit. I had to drill a hole in the FLM servo plate to mount the antenna base. After drilling the hole I attached the Racers Edge antenna base.
Position of hole to be drilled
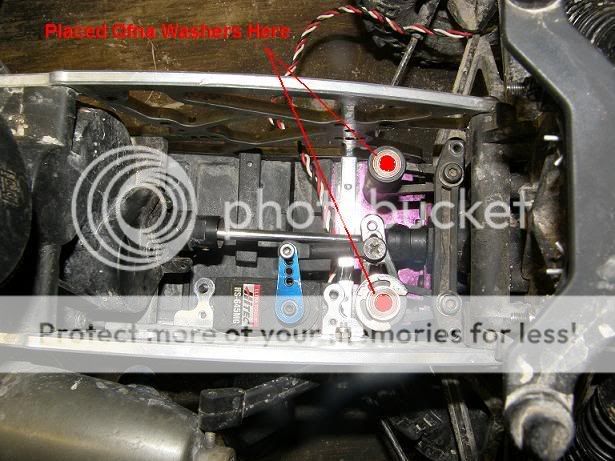
**The one thing I noticed when I went to tighten down the FLM servo plate screws, the steering got tighter also. I placed a small Ofna shim washers on top each bearing then put on the mount bracket, plate and tightened it down again. This time the steering stayed free.
Make sure the washers only touch the inside race on the bearing.
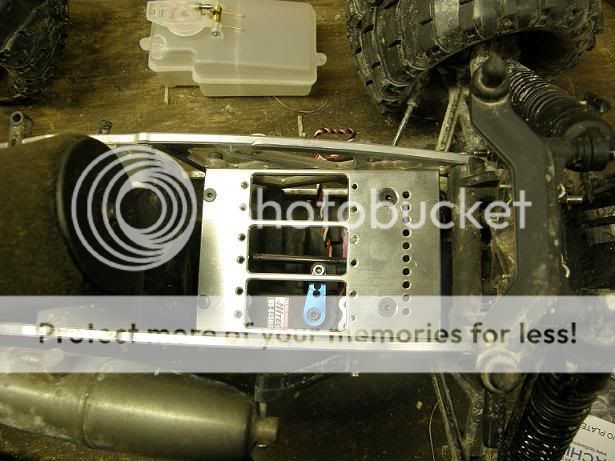
Here is the mounted FLM servo plate after being cut down (I forgot to drill the hole antenna previously before I took the picture)
Now its time to set up the rear mount for the Ofna tank. For this I used Baddasz_Savages tie rod mount idea for the rear mount.
HPI Standard Tie Rod End
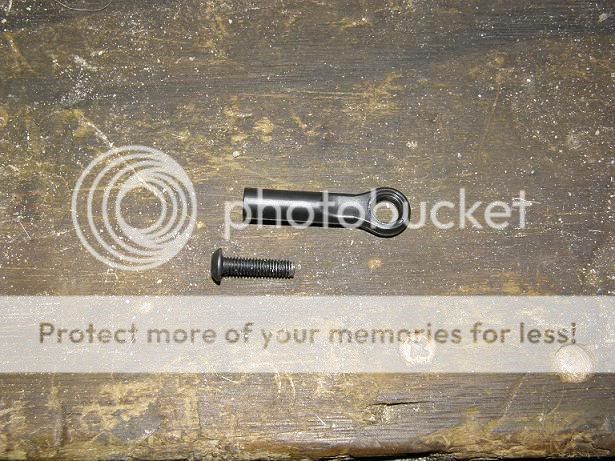
Tie rod end mounted
I have to give credit where credit is due, thanks again for sharing it Baddasz, here is his video showing the rear mount
http://s550.photobucket.com/albums/ii427/badasssavage/?action=view¤t=MOV00863.flv
Now that the front is done I moved on to the Throttle Servo mounting and linkage setup
Here is the throttle servo mounted in the FLM stock length TVPs.
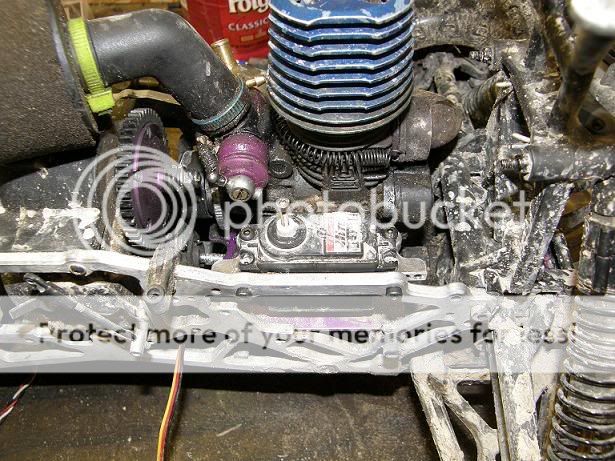
Like I stated at the beginning for the those using the factory stock TVPs, you will need to add a plate and drill holes to mount the throttle servo.
Here is a link to how to do that by Xtremsavage, scroll 3/4 of the way down to see the picture of his plate. Thanks again Xtremsavage for sharing that mod.
https://www.hpisavageforum.com/forums/showthread.php?t=9328&highlight=Mid+Tank
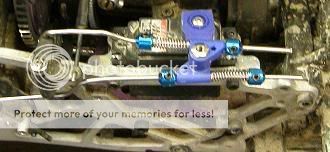
Next I used the Ofna linkage mod for the throttle and the brake. I would have to say this mod works great, a lot more responsive and better braking, than the stock linkage setup. Once I get a Spektrum setup, I will upgrade to Bankrupters better Ofna mod.
Here is the mod installed
If you have any questions on the linkage setup just ask.
Next I mounted the radio box, I used a RPM box. Plenty of room for the RX and the on/off switch. I used a HPI switch dust cover to help keep the junk out.
Mounted up RPM box

After I mounted the RPM box I placed the RX in the box with Velcro and ran the antenna wire around the side, through TVP, and up through the Racers Edge Antenna mount and tube.
Then I installed the Ofna tank to the tie rod mounts

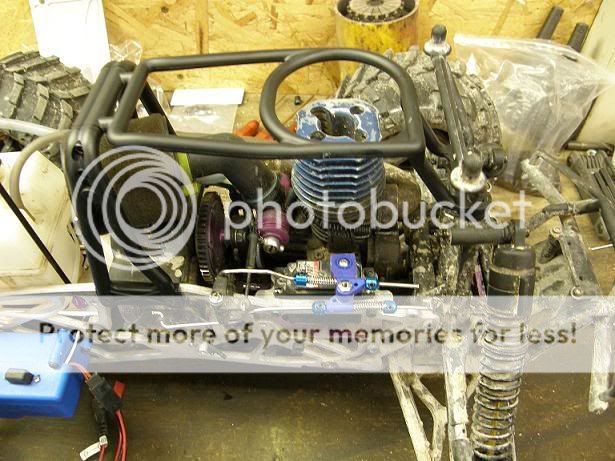
I also added the HPI plastic roll cage with hoop, to help protect the linkage and the motor.
After running all the wires into the RPM box and zip tying the wires to the TVPs. I buttoned up the box, double checked to make sure the wires were free from danger. And gave it a run.
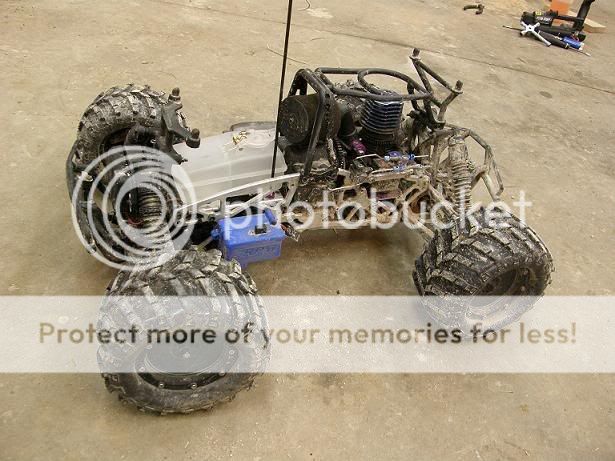
Here is the truck finished and dirty
Any questions or comments are welcome.
I will try to list what I did in a process order, so anyone else who tries this doesn't run into a couple problems I did.
Here we go...
First I removed the standard radio box, tank, and all servos.
For the front mounting spot for the Ofna 250cc tank I adapted BaddaszSavages tie rod end idea.
I cut a standard length HPI tie rod end down to 1 5/8in in length. I then removed the plastic from around the upper horizontal TVP brace that has the solid tube in it on upper part of the bulk head assembly. For this mounting, you need to cut a 3/16in slot, 5/8in in from the exhaust side of the bulk head assembly. Make sure you keep the piece that is left after your cut. After you have the slot cut, slide the metal solid brace tube through from the exhaust side on the bulk head assembly. Then slide on the cut down tie rod end, then the left over plastic, and then slide on the other side of the bulk head.
Here it is finished and reinstalled on truck
Also for this mid tank mod, I used a Hellfire battery box, which i mounted to the front shock tower. I opted to drill and screw it to shock tower. Now for me I have stock Savage 25 shock towers, so I had enough plastic to drill through for screws and nuts. You will need to look at your shock tower that you have if it is different and mount it accordingly.
If you wish to do the same then mounting the box is the next step before moving on.
Here is a shot of my box mounted, if you guys want I can take more in depth shots
Now to be able to mount the steering servo under the tank and servo mounts I had to remove a little plastic from the stock skid plate to allow for clearance.
Here is the piece to be removed
Top view after being reassembled
Then I mounted the servo mounts for the steering servo
For the steering servo to clear it had to be mounted on the bottom side of the servo mounts, so I had to remove the small plastic angles on the Hitec Servo, so it would fit flush against the mounts.
Mounted steering servo
Next I hooked up the steering linkage
It worked out rather nice for the angle on the linkage
Now for those not using the Ofna 250cc tank and need a different mounting setup for the tank you want. This is how I mounted the FLM servo plate.
The length of the FLM servo plate is to long for the stock length opening upfront, because the transmission hits the plate. So cutting down the plate is needed, for this I was lucky and got to use Wrenchmans CNC milling machine. The plate was needed to be cut down up to the countersunk rear mount holes.
This was the first time the milling machine was used for milling metal since he got it setup. Worked out great.
Here is a short clip of it in action, sorry no sound.
http://s196.photobucket.com/albums/aa215/goodolwolverine/Mid Tank/?action=view¤t=P3060372.flv
Here is the finished product
I am using the Racers Edge aluminum antenna mount kit. I had to drill a hole in the FLM servo plate to mount the antenna base. After drilling the hole I attached the Racers Edge antenna base.
Position of hole to be drilled
**The one thing I noticed when I went to tighten down the FLM servo plate screws, the steering got tighter also. I placed a small Ofna shim washers on top each bearing then put on the mount bracket, plate and tightened it down again. This time the steering stayed free.
Make sure the washers only touch the inside race on the bearing.
Here is the mounted FLM servo plate after being cut down (I forgot to drill the hole antenna previously before I took the picture)
Now its time to set up the rear mount for the Ofna tank. For this I used Baddasz_Savages tie rod mount idea for the rear mount.
HPI Standard Tie Rod End
Tie rod end mounted
I have to give credit where credit is due, thanks again for sharing it Baddasz, here is his video showing the rear mount
http://s550.photobucket.com/albums/ii427/badasssavage/?action=view¤t=MOV00863.flv
Now that the front is done I moved on to the Throttle Servo mounting and linkage setup
Here is the throttle servo mounted in the FLM stock length TVPs.
Like I stated at the beginning for the those using the factory stock TVPs, you will need to add a plate and drill holes to mount the throttle servo.
Here is a link to how to do that by Xtremsavage, scroll 3/4 of the way down to see the picture of his plate. Thanks again Xtremsavage for sharing that mod.
https://www.hpisavageforum.com/forums/showthread.php?t=9328&highlight=Mid+Tank
Next I used the Ofna linkage mod for the throttle and the brake. I would have to say this mod works great, a lot more responsive and better braking, than the stock linkage setup. Once I get a Spektrum setup, I will upgrade to Bankrupters better Ofna mod.
Here is the mod installed
If you have any questions on the linkage setup just ask.
Next I mounted the radio box, I used a RPM box. Plenty of room for the RX and the on/off switch. I used a HPI switch dust cover to help keep the junk out.
Mounted up RPM box
After I mounted the RPM box I placed the RX in the box with Velcro and ran the antenna wire around the side, through TVP, and up through the Racers Edge Antenna mount and tube.
Then I installed the Ofna tank to the tie rod mounts
I also added the HPI plastic roll cage with hoop, to help protect the linkage and the motor.
After running all the wires into the RPM box and zip tying the wires to the TVPs. I buttoned up the box, double checked to make sure the wires were free from danger. And gave it a run.
Here is the truck finished and dirty
Any questions or comments are welcome.
Last edited by a moderator: