Sparc's Mid-tank Build

This site may earn a commission from merchant affiliate
links, including eBay, Amazon, and others.

Sparc

Well-Known Member
Messages
169
Location
Seattle, WA
So it's time for me to venture away from the stock savage to see what I can do to make it better.

I decided on some FLM Extended TVP's as a base. Baddasz_Savage sold me these and a few other things for a great price, thanks!

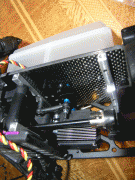
For the mid-tank I decided on PRC's ofna 250cc kit as I liked that is was lighter in weight and CF just looks cool. The plate and kit is well crafted and feels very strong.

Add in a bunch of other assorted parts like TVP braces from FLM and a RPM radio box. Some new bearings for the steering to replace the stock crappy plastic bushings.

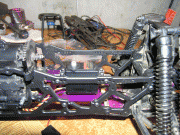
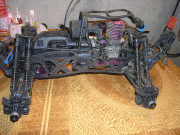
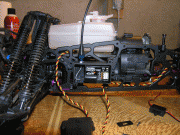
Last time it will be stock:


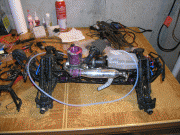
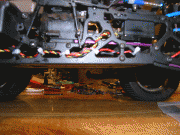
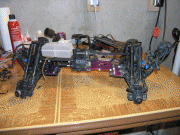
Lots of small parts:


SMF High Strength Hex Drive Kit:


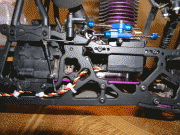
Working on forward assembly:


Steering Link:

This has some play to it, just about as bad as the stock plastic link though, is there a way I can make it better?

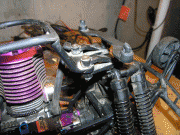
Another steering angle and I love CF:


More CF:


Another angle:


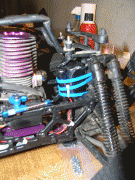
Fiber breaks and rear driveshaft:

This comes really close to the engine plate braces.
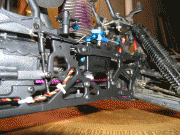
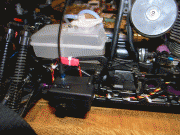
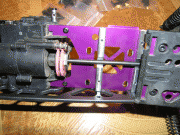
Radio Box Modding:

I really like this RPM box. It fits great and bolts right up to the servo mount holes. Also has just enough room for an antenna mount and switch.

More in a min when I get my camera offloaded.
 
Worked more on the radio box and then the battery.

Radio all installed:

The switch and the antenna are sealed with silicone.

Bottom is also sealed:


Throttle servo installed:

There is so much room in the back of this truck now. I don't know what to do with it.

Battery installed:

What happens when you have a battery too big for the boxes that fit? ZIP TIES! :D

Engine mounted and fuel lines started:


That is all that I had time for today. The rest should happen tomorrow if I didn't forget any parts.
 
That is what I wanted to do, however it won't fit 5x AA's. :(

2600mAh packs ftw tho. The charge lasts forever.
 
So I finished the build today.

Fuel lines:


Break link:

I'm really happy how the link came out. I have seen some with some really weird bends and I was sitting there thinking about how to do this, when I released a simple S bend to get it under the throttle mixer was all that it needed. I used ofna sliders and the stock rods to do these.

Baddasz_Savage's old roll bar:

Works great, thanks!

I put the first tank though it today and the thing drives like it's on rails. I'm very happy about that. I wasn't able to get it to wheelie or endo anymore... all it does is light up all 4 tires. :cheers: I hope that part of that is because I could not get it tuned right... Every new build seems to come with a problem for me. This time I have a MASSIVE fuel leak. :( I think it is the filler on the ofna tank not sealing at all. I don't have time to look at it now but I will a bit later. I do have a spare tank though if this brand new one is bad.
 
If I were you I wouldn't mount the battery up front like that without putting it in a battery box. I'm giving you this advice from recent personal experience. Every single one of the cells in my venom hump pack are dented in and it no longer works. Save your hump pack, put it in a rush or firestorm box.
 
Nice build!
With your brake rod shortened (lowered with the bend) doesn't that put extra stress in the servo?

Looks good though! I like the black look!
 
Nice build!
With your brake rod shortened (lowered with the bend) doesn't that put extra stress in the servo?

Looks good though! I like the black look!

I'm not sure how shortening the brake rod would cause it to put extra stress on the servo. The end point is set just far enough to lock up the breaks.

While I am on the topic I have the linkages set so that there is next to no play between neutral and break which removes the annoying break lag I would experience with the stock linkage. It still rolls free throughout the throttle range and at neutral but even tap the breaks and it starts grabbing. :)

I think I figured out the tank leak. When it is mounted it leaks though the fill port but when I removed the plate and the tank it did not leak at all. I have a feeling it's getting torqued a bit and flexing enough to break the seal around the o-ring. I am going to try to mount it looser when I get some time.

If I were you I wouldn't mount the battery up front like that without putting it in a battery box. I'm giving you this advice from recent personal experience. Every single one of the cells in my venom hump pack are dented in and it no longer works. Save your hump pack, put it in a rush or firestorm box.

I already have a dent in the front battery. I'm just going to have to run it till it dies then find a pack that is smaller so I can mount it in the rear or inside a box. This pack is too large to fit in any box I have seen that will fit on the savage.
 
I'm not sure how shortening the brake rod would cause it to put extra stress on the servo. The end point is set just far enough to lock up the breaks.

Reason I asked because like when your working on a car and a bolt is hard to turn you use a longer breaker bar to get more torque into it. Or when I'm at work bending EMT (electrical metallic tubing) it's easier for me to bend with a longer tail than a shorter one.

But as long as you get sufficiant braking then you should be good, I was just wondering

Oh you mean the vertical rod I thought you meant the other one. I'm don't exactly remember the physics for it... If it was a problem then people moving to the ofna mod would be having problems as well, since that servo arm is shorter than the stock servo arm for the brakes (easily shown by having to cut the battery box to do the mod). The servo is plenty powerful anyways though, it's really overkill. I'm using a hitek 5625mg.

@ Everyone:
Thanks for the comments. I am really happy with it so far. :) I could not have done it without this site and the people on it.

@ Baddasz_Savage:
They will get plenty of use (and abuse). :) Thanks again!
 
So while I fixing the fuel leak (all set now) I decided I didn't like all that weight up front so I moved the battery to the back. All it required was a 10"~ extension to the battery pack's cord. Some 20 gauge wire (I wanted something higher than the packs 24ga and I didn't have any 22 sitting around), drill to twist the pair together, solder, heat shrink, and the result is a much longer battery lead. I had to reuse the plug from the battery as the connectors are too small to fit 18ga wire inside.


I went a bit overboard with the zipties. I didn't want the wires hitting something too hot or getting stuck in the drivetrain. There is a bit of slack between each one to allow for chassis flex though.
 
Nice Build buddy. The PRC Plate fit very nicely.

Yea, I am very happy with it. It fit great and once I realized I was flexing the tank the leak got fixed. Plus I love how CF looks, so that does not hurt at all. Now all I need is a wing kit once I can afford it. :)
 
I'm trying to figure out my leak issue. All was well (nice good seal pressure tested) then I put some fuel in it today to run it and it was leaking again from around the filler gasket. Both the new tank and the one from baddasz had this problem. The tank is slightly lose on the mounts so I know it is not being flexed at all.
 
i belive this is what the 250 tanks are notorious for. the o ring on the tank goes bad, go to home depot or the lhs for a new o ring. bring the old one with you to compare. i already replaced the one on mine once, must need it again.
 
Looks good Sparc.

Here is something you might keep in the back of your head. This might be an isolated thing but, I thought I would share with you since you are running the same steering servo I am.

My servo has manage to put enough torque on the screw that connects the steering link to the bell crank and more or less ripped the screw right out of the bell crank.

This just happened to me tonight and I haven't had a chance to fix it yet. the plan is it open the hole in the bellcrank to get a little longer bolt through the link and bell crank and tighten it up with a nut on the other end.

When I get time to fix it I will try and get a couple of pics so you can see what I am talking about.
 

Latest posts

Members online

No members online now.
Back
Top