Motor Advice for Center Diff Upgrade

This site may earn a commission from merchant affiliate
links, including eBay, Amazon, and others.

Sandblaster

Member
Messages
42
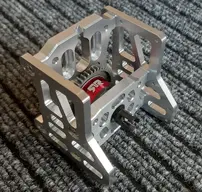
Totally rebuilt a 7 year or so, XL with center diff. and other upgrades. Using the Armma 50 tooth diff. with the Aliexpress mount. Stock electronics. First run had the Tekno 42 tooth diff. My response was, "OH MY GOODNESS, WHAT HAVE I CREATED". It was HOT. so fast was totally blown away by it. Then the ESC thermo shut down. Changed to the Armma 50 tooth diff and one tooth up from the lowest possible pinion gear. Still cannot get full throttle, just too fast, to much power. ESC does not thermo. Thinking need to drop the KV from the stock 2200 to not sure, 800KV, maybe to low?? Or something in the 1100 to 1500 KV range? And have a larger range of pinion size to tune with. Know there are others who have gone the center diff route. Looking for their experience on what they did for motors after the center diff.

If HP wants new truck, they should make the center diff stock from factory. They would have one extremely fast, tough machine to sell.
 
If you want to keep the 2200Kv motor, a 50t spur with 11t pinion it's probably the best compromise between speed and thermal efficiency, assuming you're not using tires bigger than 160mm of diameter and your Savage does not weight more than 6 Kg... I had the Hobbywing Max 8 Combo and was running 50t spur and 13t pinion, the ESC was getting in to thermal protection in less than 10 mins, and i run on light tires - Backflip Lp's from Arrma. So, if you really want to have a reliable Savage that you can pull the trigger, put a Max 6 combo on it, or go a step further and get the Castle MAMBA MONSTER X 8S with the 1717 1650KV motor, then put a 17t pinion in it and you're good to go. In my opinion you don't need lower Kv than that. The lower the Kv, the heavier the motor is...
 
If you want to keep the 2200Kv motor, a 50t spur with 11t pinion it's probably the best compromise between speed and thermal efficiency, assuming you're not using tires bigger than 160mm of diameter and your Savage does not weight more than 6 Kg... I had the Hobbywing Max 8 Combo and was running 50t spur and 13t pinion, the ESC was getting in to thermal protection in less than 10 mins, and i run on light tires - Backflip Lp's from Arrma. So, if you really want to have a reliable Savage that you can pull the trigger, put a Max 6 combo on it, or go a step further and get the Castle MAMBA MONSTER X 8S with the 1717 1650KV motor, then put a 17t pinion in it and you're good to go. In my opinion you don't need lower Kv than that. The lower the Kv, the heavier the motor is...
Thanks for the reply. Can you use full throttle and keep it on the earth? It is a totally different truck with the center diff. Fast and furious would best describe it. Want to tame it just a bit. Ordered cheap motors from Ali Express. Do not expect much, something to play with and try different things. It is so fast now it is kind of scary and that is not full throttle. Are you running 8S? Had to go smaller tires to keep a pinion gear in it. Then found the stock motor mount and side rails were flexing away from the motor. Center diff and another rebuild was the solution. People simple would not believe the difference in the truck now over stock.
 
Well, unless i let the truck reach some speed i can't go full throttle, otherwise it flips over in a blink of an eye, but you already saw a video of it running on this post: https://www.hpisavageforum.com/threads/new-on-this-forum-heres-my-savage-flux-xl.20418/
I never tried 8S on it, I could.. but i don't think it would be healthy for the drive train, also for bashing it's completely overkill, 6S is the sweet spot in my opinion. In this video you can see my first run with the HW Max 8 and the 2200 kv motor, on a 50t spur and a 14t pinion, i just threw a wheelie bar in it because i couldn't keep the front end down, but it was 9 months ago:
 
Really glad to make connections with you. Your videos inspired me. Did not totally understand what I was watching in your vids. NOW I do. Deleted the OEM transmission, install a center diff with motor mount & it is the definition of a MONSTER TRUCK. Every thing else is tame compared to it. Have wanted to ask you questions on your build, really like it. One thing could not figure out is how you get the battery in the frame. Updated the battery boxes with the ones with the side door. They are OK. Like no battery boxes on outside better. Also how did you tie the top braces to the towers?

Decided you are not in the US. Guessing, looking at the trucks in vids, Europe somewhere. Suggest you consider a lot of post showing your build and your running videos. May they inspire others who are updated there XL's. Especially those moving from gas to electric. Keep making videos. I believe you have a lot of great knowledge to share with us.
 
Totally, if you want a reliable Savage Flux/conversion, a center diff is the way to go.
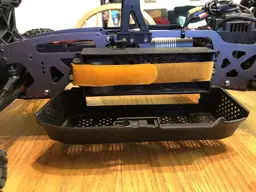
To run a single battery inside the frame, i used this custom-made holder
1.jpg3.jpg
this was made out of an old water drum and a pressure switch box, you probably wont find those items near you, but you can use different stuff to do something similar.
This single battery setup was very good for jumps, that thing took so many hard landings, but to put a bigger motor i had to return to the side boxes.

Now i have the hpi side boxes again, they are fine for moderate bashing, but not for big jumps, i can show it more in detail, but i'm not done with it yet, e need to find a better plastic to do something more reliable
sav232.jpg

the tower to tower braces are made out of 8x8mm square aluminum pipe, the pipe is connected to the shock holes on the towers with m3 threaded rod inside it and a nut on each end.
As i said on another posts, don't be afraid to modify stuff, drill holes and make threads, thinking outside the box and being able to adapt parts that are not a direct fitment is a very important skill to have in this hobby.
 
Last edited:
When I started the rebuild, wanted to have water proof receiver box. Better battery boxes. This is what I have now. IMG_2121.jpegIMG_2122.jpeg
Using stuff from Jenny's. Flux V2 plastics. Got my water proof receiver box and easier servo access. IMG_2124.jpeg

Battery boxes can bolt to the sides with no extensions. IMG_2125.jpeg

Can see bolts on inside. Not sure how they will hold up to the jumps you do. So far good for me. To make them work have to use the top cross member. That required drilling and tapping into the center diff mount. Should be very strong.

Had the same problem when trying to fit a battery between frames. No room. I like the new boxes, they do not take as long of a battery as the original. Like the way they really hold the battery. Easier to install and secure battery.

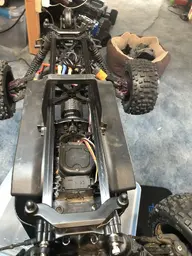
Only weak point of concern is the front drive shaft. To get the correct length have to use one from the Vorza. Can see the difference. Have a cover that covers little over half of the open bottom. Left off for ease of checking temps while still tuning and learning.

This was the most challenging and FUN build I have ever done. No Manuel, Goals of what I wanted when finished and a bunch of parts. And you inspired me to go for it. You said to not be afraid of drilling holes etc. Thanks for the inspiration.

HPI has the best platform in this truck. So much can be done. Extremely durable. Think I am still on original arms. Bent one shock shaft. Probably not running it hard enough.

The shock towers do seem to lean with time. Next will do the bars between towers. Thanks for another answer on how to do it.
 
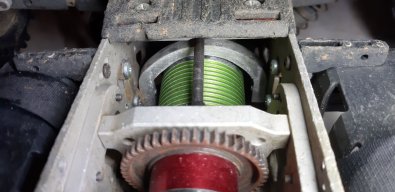
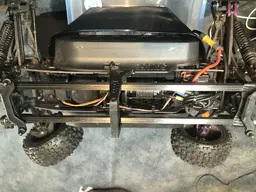
It's looking good(y) If you want to ride some jumps with it, one thing i really recommend is making a holder to support the back of the motor ... those 2200KV motors weight around 400g, and the only thing holding them in place are two m4 screws, a jump above your hip level is enough to make the chassis bottoming out and slap the floor, and when this happens the center diff mount and those screws go through a ton of forces and stress. 8x8mm aluminum bar it's what i'm using for that
Something like this:
for.jpg

I like the new V2 battery boxes, they look stronger than the old ones.

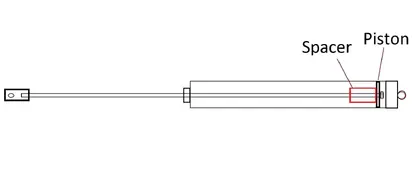
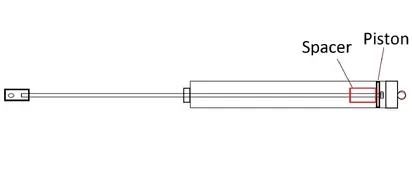
One thing you can do to avoid bending shock shafts so often is putting a spacer inside the shock, i have 15mm spacers inside mines, this will lower the car and make it handle a lot better.
shock.jpg

The shock towers will start to bend with the time and even more with jumps, the tower to tower braces are a good help for that and also a good way to support the bodyshell when the truck rols over.
 
1667595697561.png
How does having a spacer there lower the truck, all that does is reduce the downward travel on the shock, the shocks don't give the truck it's height that is done by the spring strength working against the weight of the truck. Take the springs off and the truck will sit on the deck, the shock only takes the bounce (rebound out) of the travel. Just the same as any car, that's why they call it a shock absorber.
 
Really good point of the motor support the OEM had in very well supported.
 
View attachment 10066
How does having a spacer there lower the truck, all that does is reduce the downward travel on the shock, the shocks don't give the truck it's height that is done by the spring strength working against the weight of the truck. Take the springs off and the truck will sit on the deck, the shock only takes the bounce (rebound out) of the travel. Just the same as any car, that's why they call it a shock absorber.
I think i understand what you're saying, but your point is only valid if your springs are very loose and the shocks are halfway compressed when the truck is standing still( like the new Vorza Truggy Flux)

Also, you can't compare real cars with rc cars, the shocks do the same job on both situations, but you don't drive a rc monster truck like you drive a real car, so you have to adjust your spring tension accordingly.

Adding a 15mm spacer it's basically the same as cutting 15mm of the shock shaft, if a shock fully uncompressed has 165mm and you add a 15mm spacer inside, it means the downward travel will be 15mm shorter, so now, completely uncompressed, the shock will have 150mm instead of 165... doesn't mean the truck gets 15mm lower, but gets lower than before, and that it's undeniable... Having less travel reduces body roll and improves the handling, but of course, you need to adjust your spring tension to make it work and suit your driving style.
Another thing: if a shock as 60mm of travel and we reduce it to 40mm, that will reduce the probability of bending the shafts. The amount of force you need to bend a 40mm shaft it's higher than a 60 one, that is simple physics right there. Hope i made it more understandable
 
Last edited:
Update. Looking for a source for 8mm aluminum tube, found this: https://www.amazon.com/dp/B08MZHZFZZ?psc=1&ref=ppx_yo2ov_dt_b_product_details

OK. Why not. This is the result so far. Used 4mm by 50 screws to go through the shock bushing. Replaced the plastic with metal, drilled out to 4mm. On the back placed two nuts on the screw to take up more space inside the tubes. On front have to screw the bolt in all the way. Goes in tube some distance. The tubes have a bit of play around the nuts and bolts. Think it will work OK as the tube are to keep the shock towers from leaning inward. Now. they push against each other. Comes tight against the center body support. Trimmed it a bit. Only time will tell how well it works. Thinking with two a little give is not a bad thing. This is pure KISS, Keep It Simple Stupid.

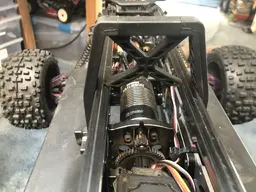
Motor brace is made, waiting to decided what motor and pinion needed before drilling bolt holes.
IMG_2129.jpegIMG_2130.jpegIMG_2131.jpeg
 
Looks good (y), you can make a plastic insert with a 4mm hole to remove the play of the tube around the bolt, i did that to mine:
DSC08531.jpg

For the motor, i would recommend you to make the chassis holes like this:
20221112_095525.jpg

this way you can adjust it better, and have the possibilities to put a smaller/bigger pinion (i'm talking about one ore two teeth)
 
The carbon fiber has a round center. Thinking of some tube like fuel line tubing. Need to do my research on what is available. Wonder how you did the center. Latest armma designs for center rod all have some give in them now. Something like fuel tubing might offer the same type of flex. Our frame is different. Shock towers have a lot of flex, to much over time.

Waiting for different KV motors to arrive to play with. Pinion size can be quite different. Thought about the elongated holes. Need to narrow down the pinion size first.

Appreciate the sharing of information.
 
Hello,

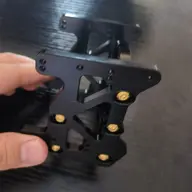
I too have decided to revive my Flux XL and picked up the Ali Express center diff mount. How does the center diff mount bolt in? I presumed that it used the stock flux hp transmission bolt holes. Is it still using the M3 sized screws? Thank You!
 
Hello,

I too have decided to revive my Flux XL and picked up the Ali Express center diff mount. How does the center diff mount bolt in? I presumed that it used the stock flux hp transmission bolt holes. Is it still using the M3 sized screws? Thank You!
All you need to do is put the diff and motor in it, put it in the truck with the center driveshafts, find the correct placement, then draw a line all around it, then drill some holes on the chassis... can you put some pictures of that Aliexpress kit, never saw it...
 
I believe it’s the same kit the OP is running. Not sure if we’re allowed to post links, but Ali has it under “Alloy High Power Mount…”. It’s estimated to be a month before I get it. I was hoping to not drill any holes in the TVP as I can’t find OE replacements for them anymore. Based on the OPs pictures it looks like m3 sized bolts, but just curious.
 
I believe it’s the same kit the OP is running. Not sure if we’re allowed to post links, but Ali has it under “Alloy High Power Mount…”. It’s estimated to be a month before I get it. I was hoping to not drill any holes in the TVP as I can’t find OE replacements for them anymore. Based on the OPs pictures it looks like m3 sized bolts, but just curious.
Unless you're tight on money, you can get some TVP's on Jennys RC and save the ones you have... Judging by the poor quality pictures on AliExpress, when compared with my Alza kit who has m3 holes, the Ali one seems to be m4, but it's hard to judge just based on the pictures... I don't see any reference about that Ali diff kit having a center drive shaft included, so unless you already have one, you'll need a bigger shaft to make it work

H6eabfdaf64bf4459885399df01226354C.jpg20230311_111413.jpg
 
Good idea, I’m running the flux Xl conversion kit on an HP, but it looks like the GTXL-1 TVP should bolt up with some new holes for the trans.

Yep, I have an 8x110 front driveshaft from my spare Vorza parts. I would’ve run the Alza or Draco diff, but didn’t want to plop too much on my Savage. Parts availability still isn’t fantastic for HPI. Upgrading/rebuilding the flux Xl is short term, I may get a new my rig later on. Kind of a bummer most new MT offerings are just truggies, but I digress.
 
Update. Looking for a source for 8mm aluminum tube, found this: https://www.amazon.com/dp/B08MZHZFZZ?psc=1&ref=ppx_yo2ov_dt_b_product_details

OK. Why not. This is the result so far. Used 4mm by 50 screws to go through the shock bushing. Replaced the plastic with metal, drilled out to 4mm. On the back placed two nuts on the screw to take up more space inside the tubes. On front have to screw the bolt in all the way. Goes in tube some distance. The tubes have a bit of play around the nuts and bolts. Think it will work OK as the tube are to keep the shock towers from leaning inward. Now. they push against each other. Comes tight against the center body support. Trimmed it a bit. Only time will tell how well it works. Thinking with two a little give is not a bad thing. This is pure KISS, Keep It Simple Stupid.

Motor brace is made, waiting to decided what motor and pinion needed before drilling bolt holes.
View attachment 10117View attachment 10118View attachment 10119
You could also try using epoxy to glue the nuts into the end of the tube. I would do this with the bolt in place and then gently remove the bolt before the epoxy is 100% hard. On my vorza chassis brace I just drilled and tapped some Alu bar and glued that into the tube with epoxy. Loving the carbon version though gonna get some and try it!
 

Latest posts

Members online

No members online now.
Back
Top