Flux rebuild

This site may earn a commission from merchant affiliate
links, including eBay, Amazon, and others.
Today I tried to run my flux with the new refurbished MMM V3. I plugged in the my 3S packs got the tone sweet, then check the steering and nothing try throttle nothing again. So I unplug and replug-in the the packs and no tones. There was no other sounds or smoke when I first plugged the packs in, what could be wrong?
 
Last edited by a moderator:
They want to replace it with a new one, but I want them to fix this one.


how come w.t.f.? are the one you have & the one they offer different versions? is one better than the other? good knowledge to have in case i ever run into similar situation 😉
 
Update

Happy new year all :bozzy: , it's been a while.
I was seriously considering selling my flux, but decided to give it another go seeing I've wasted/spent money man so much modding it and would lose a heap selling it.

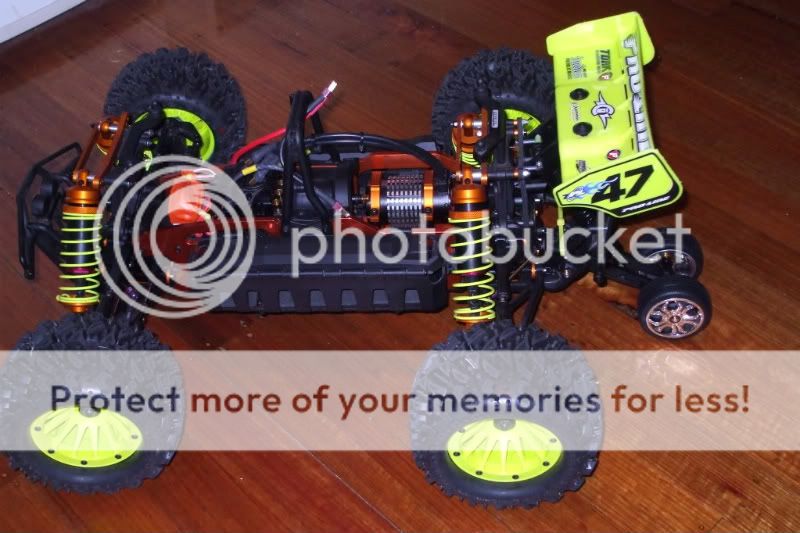
I got the replacement speedy on chrissy eve(mfc). I was surprised to find that it had an on/of switch as it's refurbished. Well it survived the 1st hurdle it didn't fry when I connected the LiPo's to it.
I had some trouble linking it to my rx, it wouldn't set the throttle for some reason wether throttle was reversed or not, I switched to HRS mode and it linked no worries, just had to reverse the motor with the Castle link.

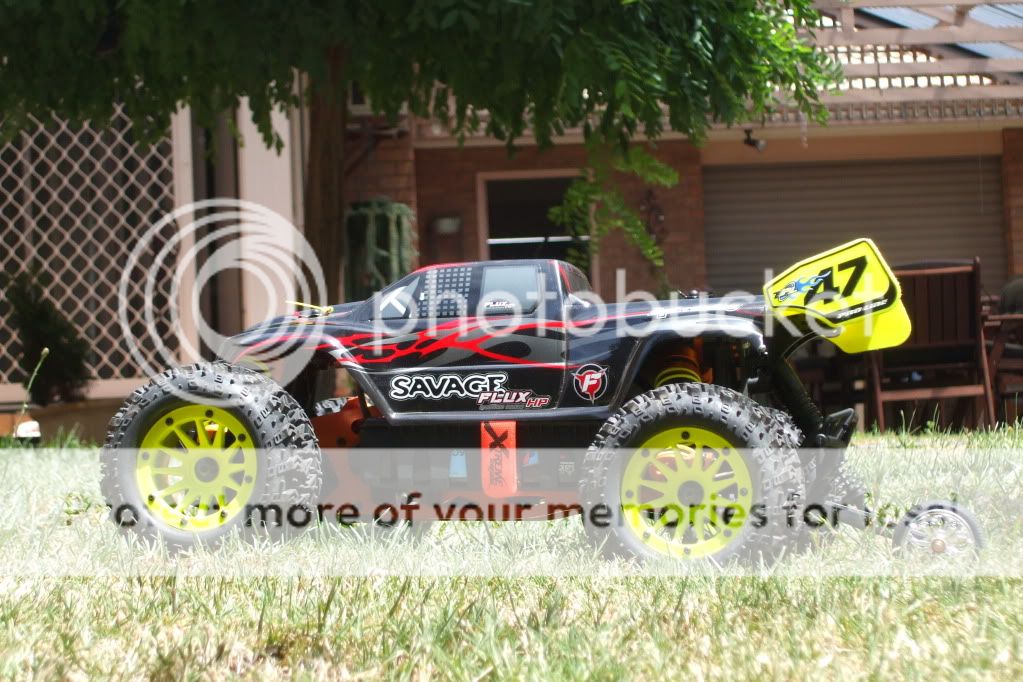
I don't want to chance it so I'm not using the Axial bl/Big joe wheel and tyres, going with Maximizers/Zombies, but they look to small to me for such a big truck, but what you gonna do. On the bright side the yellow maxi's go well with my body.

I gave it a quick test drive on the driveway and was happy to see it was pretty fast even with the 14/45 gearing that I was going to run the big joe's with. I'm going to order a on/off switch boot and an 18t RRP pinion for a little more speed.

I'm going to make a short 2" extension so I can use the Castle link without have to remove the balloon from the rx every time I want to use it.

DSCF1343.jpg


DSCF1347.jpg


DSCF1350.jpg


DSCF1352.jpg
 
WOW!!!! That is one SICK A$$ FLUX you have bud!! Your build turned out KILLER!!!!
 
Very nice my man, i love the Baja Bug body, and your color choices are the best i have seen, especially since orange is my fav color lol. is the flux standard length or did u ext it. Also see that your using the HPI wheely bar, take it your custom one didnt work out? was a very nice effort tho. I think the tire/wheel combo looks awesome on the truck, size matches the scale look of it IMO... great build.. +1 repped ya
 
WOW!!!! That is one SICK A$$ FLUX you have bud!! Your build turned out KILLER!!!!

Thanks Scotty :cheers:

welcome back & your truck looks killer with them tires. 😛unkrock:

It's good to be back thanks Freddy I almost wasn't, I've also got Mulchers. 😎

Very nice my man, i love the Baja Bug body, and your color choices are the best i have seen, especially since orange is my fav color lol. is the flux standard length or did u ext it. Also see that your using the HPI wheely bar, take it your custom one didnt work out? was a very nice effort tho. I think the tire/wheel combo looks awesome on the truck, size matches the scale look of it IMO... great build.. +1 repped ya

Thanks Morf. Yeah just std the ext weren't out when I orders these, but will go ext if this speedy survives long enough:Xfingers:. I sort of lot interest for a while there after the second speedy went bang 😛uke:, but I'll see if I can work find some wheels to test the wheelie bar. I've only had a quick test drive in the driveway rctruck yesterday since I started the rebuild months ago.
 
Thanks Kev, back at ya bro.

When to my LHS today picked a servo extension along with some Ansmann pre-mount and Venom 12mm hex for my wheelie bar. So I've been doing some wrenchin I changed to a RRP 16t pinion, motor mount screws are behind the tvp so I had to take it off to get the motor out.

DSCF1355.jpg


Also balloned the rx and with the extension, now I don't have to remove it every time I use the Castle link. 😎

DSCF1359.jpg


I want to go as easy as I can on this esc on 6s so until I'm sure it wont overheat I'm gonna use the stock body with a vent cut in the windscreen for max cooling.

DSCF1380.jpg


DSCF1362.jpg


DSCF1365.jpg


DSCF1372.jpg


God, I hate those wheel nuts. When is HPI gonna make some real 17mm hex for XL axles. C'mon HPI they'd sell like hot cakes.

The ansmann pre-mounts

DSCF1383.jpg


Here you can sort of see the the Vemon hex, I used a couple of LST shock stand-off drilled out to 4mm with cs washers as spacers on the shaft so they don't rub on the arms. I haven't used bearing the wheels and hex just spin on the shaft.

DSCF1385.jpg


Here it is all mounted up. rockout

DSCF1389.jpg


DSCF1387.jpg


DSCF1388.jpg


Hopefully it'll last longer then 1 jump. :lol:
 
Wheelie bar test

It works a little to well only managed to get one wheel to lift about 1/2". The wheel are bigger then I wanted so I need to short the shock a little and maybe lighten then fluid as well. It raises the rear of the truck.

DSCF1394.jpg


DSCF1400.jpg


DSCF1395.jpg


The oldman's video camera battery needed charging so hopefully tomorrow I'll get some footage of squirelling and not lifting.
 
truck looks wicked!

i wonder if the big joes & gearing played a role in the esc problem.

which lipos are you running? ive heard horror stories with 3s 25c or less.
 
Mighty fine ride there dude.

Are you using an alloy horn?

If you aren't I'd recommend getting a 3-way clamp on horn. That way even if you lose the main servo screw, the horn stays on.

R1702012R.JPG


DF
 
kool vid man. i was actually glad to see you bashin the stock lid on the street instead of the tricked out bugg.
 
Thanks Freddy only thing my cuz missed the backflip. I wish I'd had the bug body on, that long slide on the lid tore through the thin lid and chewed my shiny orange shock mount. 😛uke:

DSCF1448.jpg


Anyway the wheelie bar sort of survived the little cartwheel I did, just bent the axle. It's 4mm threaded rod only mild steel, can't find any high tensile that small.:dunno:

DSCF1430.jpg


Lost steering again at the end of the vid. This time the stepped screws in the servo saver arm came loose, luckily it didn't fall out until I got inside. Is there any fix for this?
When I put it back in, I notice that both arms were hitting the tvp's. Because I swap the posts around to get a better alignment with the servo. So I trimmed one and hacked the other to get it to clear.

DSCF1442.jpg

DSCF1436.jpg

Time will tell if I took off too much.

Oh and now I've also got some tie-in on the right rear.

DSCF1445.jpg

DSCF1443.jpg


Anyone know if I can get a replacement pin from anywhere? Lunsford's would be great!
 
Last edited by a moderator:
Regarding thin lids ripping through. The LHS dude here recommended I tape up the entire lid with 2-3 layers of fiber reinforced tape. I did so, and the stocker's survived ok so far, even after high speed slides down tarmac on the roof.

As for the 4mm pins. I'm looking for them too. I'm thinking a captured pin set from say a 1/8 truggy could be cut down and rethreaded. Gonna be painful rethreading high tensile strength steel without access to a proper mill tho.

DF
 
Good idea's DF, a 55mm pin of 1/8 scale would be perfect for the carrier, but your right about the rethreading HT steel it would be a PITB.
 
Last edited by a moderator:

Latest posts

Members online

Back
Top