Biddie_fiddler
Well-Known Member
- Messages
- 332
- Location
- Perth, WA
Hi all!
First of all, hope you all had a wonderful christmas! The Mrs got me a new shell for the savage and this thread is a story of my first time ever painting one of these!
I hope it helps as a guide for any other newbies who plan on painting their on shells too.
Tell ya what, its a lot of fun!!
I got the Gigante truck body for the savage flux xl.
My favourite colour is burnt orange, I have always wanted this car in this colour, so it was only right to have my savage looking similar.
Anyway, enough ranting! Below is the stuff I used:
HPI 7124 - Gigante truck body
Tamiya PS-5 black paint
Tamiya PS-61 metallic orange paint
Tamiya PS-41 bright silver paint
masking tape
lexan body scissors
After watching many videos on youtube about how to paint a body, I was ready to give it a go myself! There are some photos at the end of this for reference")
Step 1: Cut out the body
Its pretty self explanatory, follow the lines of the body and cut it out of the mould. Take your time!! There is no point rushing this. I recommend marking out the outlines with a black marker so its easier to follow, I didn't do this but it would have made my cuts a whole lot straighter! I cut out some of the rear, just about the motor to help with cooling, it wasn't necessary but I thought I would anyway. This was by far the most annoying part!
Step 2: Drill body post holes
Apparently you can buy punches for this but a drill works just as well!! The body already had dimples to show where to drill the holes, I started with a small drill bit and worked my way up till I got the right sized hole, unfortunately I can't remember what size that was!
Step 3: Wash the body
I washed the body with warm water and dish soap thoroughly with a rough sponge to scuff up the plastic a bit. It helps with the paint adhesion to the body. I then let it sit in the sun till it completely dry.
Step 4: Masking
This part took the longest out of this whole process. You need to have a clear idea in your head on what you want the body to look like so you can mask off the required areas. I wanted a simple 2 tone colour, so the making areas were simple for me. I definitely need more practice doing this though, getting it right took a long time!
The body came with window masks which I used to keep the windows clear, I wanted to tint them but forgot to buy some paint to tint them.
I went with a simple stripe down the center of the bonnet to the windscreen, then masked off the roof, the sides, and part of the back. The side and rear followed a body line so it was easy to get it straight.
Step 5: Painting
The metallic orange comes out best when it is backed with bright metallic silver. I wanted to back it all with black too.
I started with the orange, I did a total of 4 coats to get the orange to stand out the most. Once all coats had dried I peeled off the masking tape (excluding the window masks) and did 3 coats of the bright silver. The last silver coat was quite heavy though.
Finally I went over the entire body with 3 coats of black.
All in all, the painting took less than an hour to do I'd say. It was very sunny so they paint dried pretty quick with every coat I did.
Step 6: Stickers and Finalising!
Finally, I removed the window masks and the protective film on the shell and began the fun journey of putting stickers on it. I didn't follow the guide it gave cause that went to bin, who needs them!
The end result is amazing! I absolutely love the way came out!
I made a couple mistakes throughout, one being that I didn't notice a tiny bit of masking tape left over for the silver stripe, but it was a learning experience. I am definetely going to keep painting my own bodies from now on, lots of fun and they come out awesome!!
If you made it this far congrats, your reward is a cute kitten!
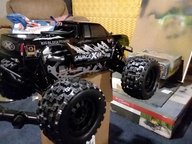
There are photos attached of the process and the final result. Thanks for reading!! Happy new year all!!


First of all, hope you all had a wonderful christmas! The Mrs got me a new shell for the savage and this thread is a story of my first time ever painting one of these!
I hope it helps as a guide for any other newbies who plan on painting their on shells too.
Tell ya what, its a lot of fun!!
I got the Gigante truck body for the savage flux xl.
My favourite colour is burnt orange, I have always wanted this car in this colour, so it was only right to have my savage looking similar.
Anyway, enough ranting! Below is the stuff I used:
HPI 7124 - Gigante truck body
Tamiya PS-5 black paint
Tamiya PS-61 metallic orange paint
Tamiya PS-41 bright silver paint
masking tape
lexan body scissors
After watching many videos on youtube about how to paint a body, I was ready to give it a go myself! There are some photos at the end of this for reference
Step 1: Cut out the body
Its pretty self explanatory, follow the lines of the body and cut it out of the mould. Take your time!! There is no point rushing this. I recommend marking out the outlines with a black marker so its easier to follow, I didn't do this but it would have made my cuts a whole lot straighter! I cut out some of the rear, just about the motor to help with cooling, it wasn't necessary but I thought I would anyway. This was by far the most annoying part!
Step 2: Drill body post holes
Apparently you can buy punches for this but a drill works just as well!! The body already had dimples to show where to drill the holes, I started with a small drill bit and worked my way up till I got the right sized hole, unfortunately I can't remember what size that was!
Step 3: Wash the body
I washed the body with warm water and dish soap thoroughly with a rough sponge to scuff up the plastic a bit. It helps with the paint adhesion to the body. I then let it sit in the sun till it completely dry.
Step 4: Masking
This part took the longest out of this whole process. You need to have a clear idea in your head on what you want the body to look like so you can mask off the required areas. I wanted a simple 2 tone colour, so the making areas were simple for me. I definitely need more practice doing this though, getting it right took a long time!
The body came with window masks which I used to keep the windows clear, I wanted to tint them but forgot to buy some paint to tint them.
I went with a simple stripe down the center of the bonnet to the windscreen, then masked off the roof, the sides, and part of the back. The side and rear followed a body line so it was easy to get it straight.
Step 5: Painting
The metallic orange comes out best when it is backed with bright metallic silver. I wanted to back it all with black too.
I started with the orange, I did a total of 4 coats to get the orange to stand out the most. Once all coats had dried I peeled off the masking tape (excluding the window masks) and did 3 coats of the bright silver. The last silver coat was quite heavy though.
Finally I went over the entire body with 3 coats of black.
All in all, the painting took less than an hour to do I'd say. It was very sunny so they paint dried pretty quick with every coat I did.
Step 6: Stickers and Finalising!
Finally, I removed the window masks and the protective film on the shell and began the fun journey of putting stickers on it. I didn't follow the guide it gave cause that went to bin, who needs them!
The end result is amazing! I absolutely love the way came out!
I made a couple mistakes throughout, one being that I didn't notice a tiny bit of masking tape left over for the silver stripe, but it was a learning experience. I am definetely going to keep painting my own bodies from now on, lots of fun and they come out awesome!!
If you made it this far congrats, your reward is a cute kitten!
There are photos attached of the process and the final result. Thanks for reading!! Happy new year all!!