HIRISK
Active Member
- Messages
- 72
- Location
- Melbourne, Australia
Hi Guys,
I know this has been done to death by everyone, but I still thought it would be worth posting up how my set up was done and how it all went together.
This install has been done on my Savage X RTR with OS 30VG.
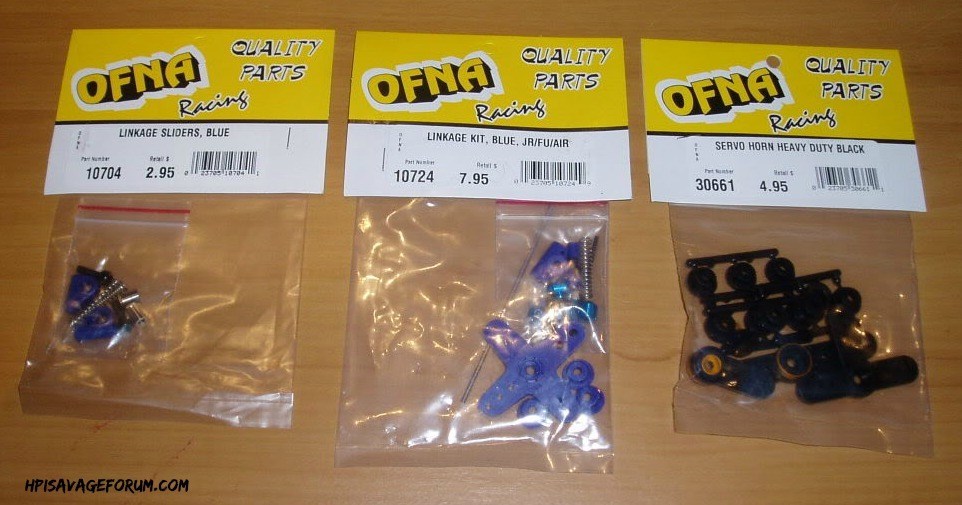
WHAT YOU NEED TO BUY
THE STOCK HPI ITEMS YOU WILL RE-USE
STEP 1 - REMOVE EXISTING LINKAGE SET UP
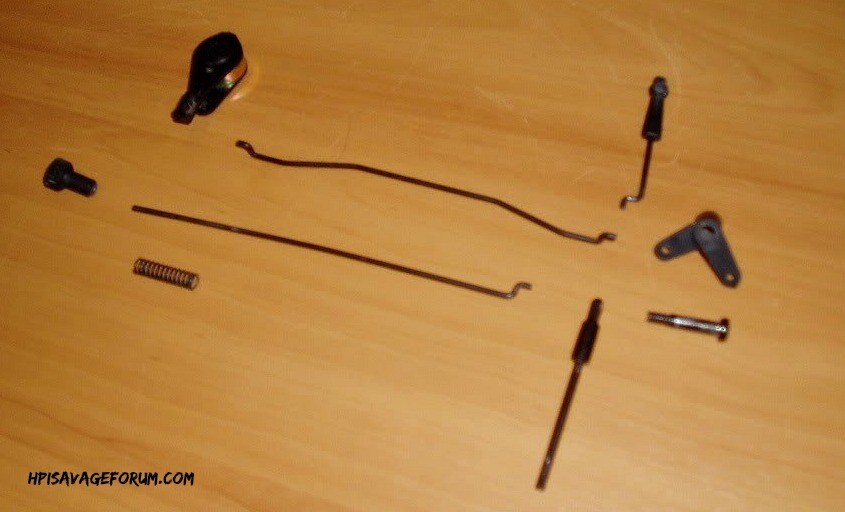
The first thing you want to do is remove the existing throttle and brake linkage set up. This will include the servo horn, linkages, springs, throttle mixer etc.
Once you have removed all these items you should end up with the following bits and pieces off your truck.
STEP 2 - PREPARE THE NEW GEAR FOR INSTALL
The next thing you want to do guys is prepare all the new items, as well as some old items from the original linkage set up for install.
I find that by laying everything out will help you visualize what you need and where it will all end up going.
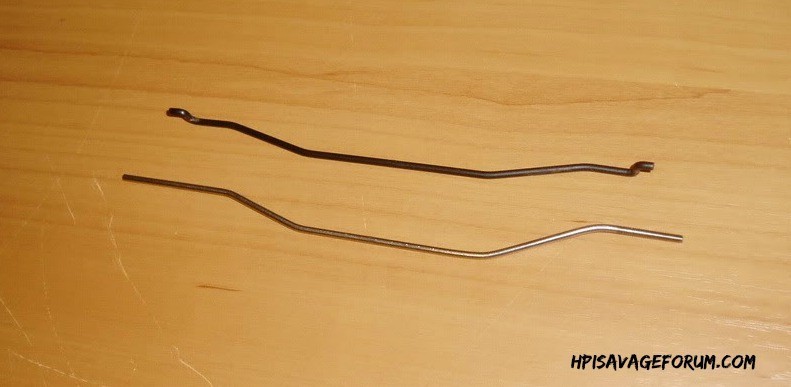
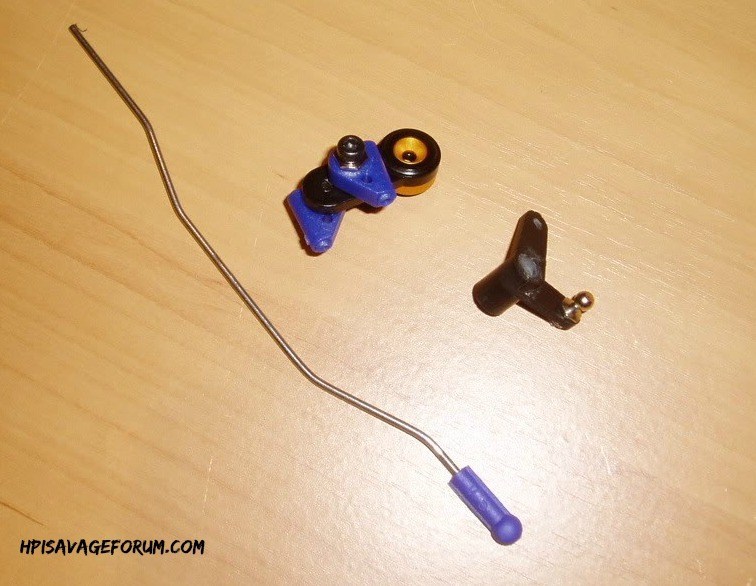
You are going to have to bend the supplied OFNA threaded rod to a similar shape as the existing HPI throttle arm. Once you get it close, leave it for the moment, as once you install it you may find you need to change the shape a bit to suit.
Get the small silver OFNA ball end and nut and attach it to the throttle mixer. This is what the Blue OFNA ball connector and threaded rod will connect too.
Thread the Blue OFNA ball connection onto the the throttle rod too.
Get your existing HPI brake rod and put a small bend in it about half way between where the servo is and where it connects to the gearbox rod, this just helps it move freely. This bend only needs to be small.
You are also going to have to bolt the sliders that come with the kit to the servo horn. Use the long single bolt supplied, not the two small ones and connect BOTH Sliders to the OUTSIDE hole on the Servo Horn.
Here are some photos of the above items.
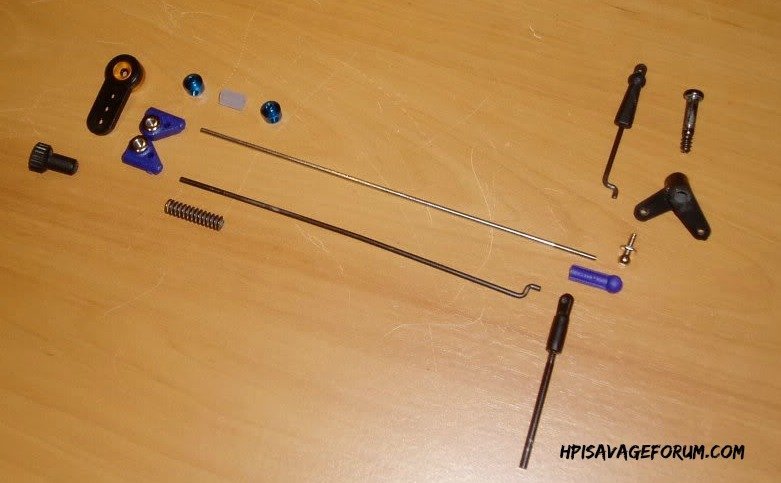
** Please note the the top throttle slider on the below image was moved to the outer hole (as per described above) for a better fit and clearance. See the installed photos for reference.
STEP 3 - INSTALL IT ALL ONTO THE TRUCK
Now the fun part, you get to fit it all onto the truck.
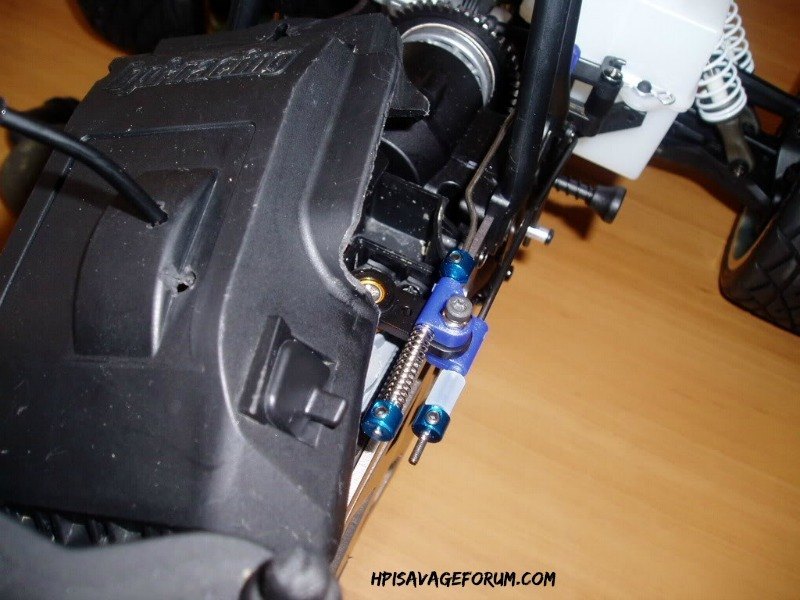
The first thing you need to do is get a small, maybe half inch round file and just file a small half circle into the radio box lid where the throttle rod ends. This gives just a little more clearance. Please see the installed photos for more details on where and how big this filed area is (not big at all and not noticeable).
Start by re-fitting the throttle mixer to the plastic bracket on the TVP.
Then attach your servo horn to the servo.
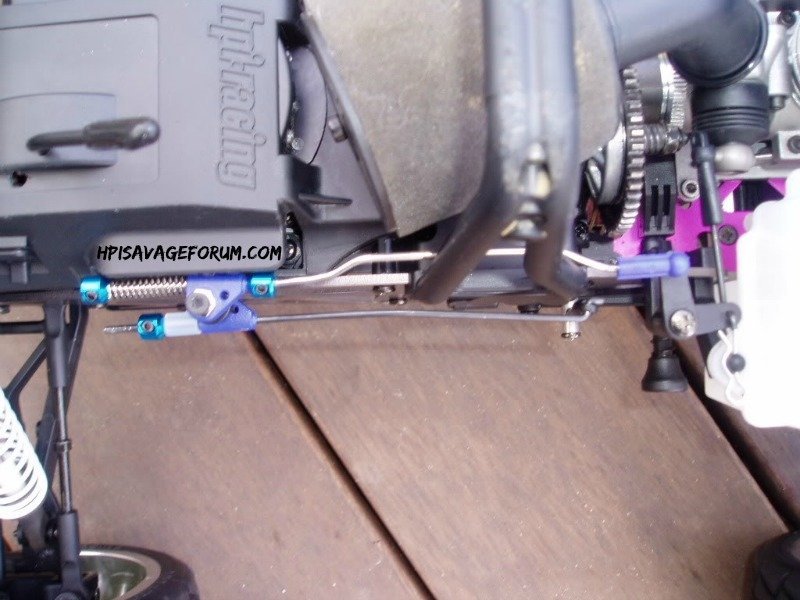
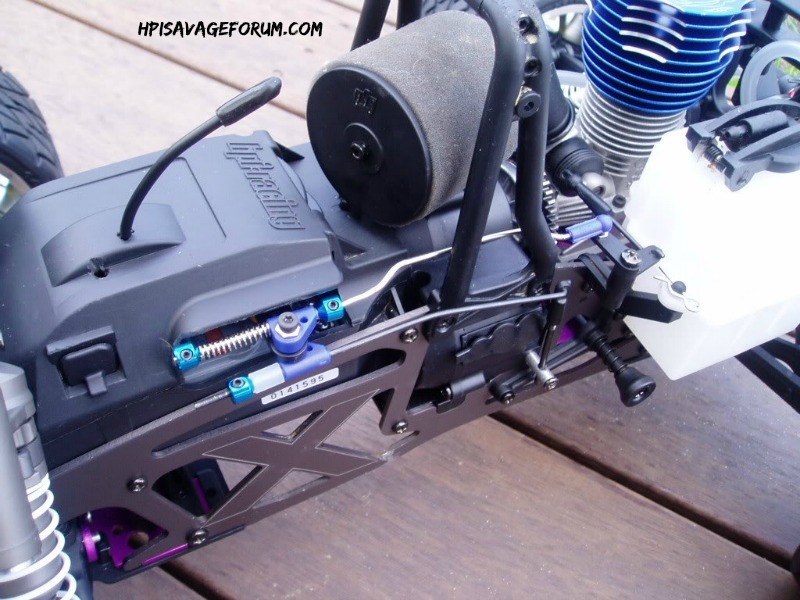
Attach the existing HPI brake rod assembly to the brake mount on the side of the gearbox and slide the rod through the lower slider on the servo horn. Instead of re using the HPI brake knob and spring, I opted for the OFNA metal end and a small piece of fuel tube - this will give a much more responsive and firm brake feel.
Make sure you have a Blue OFNA metal stop on the throttle rod BEFORE you slide it onto the slider.
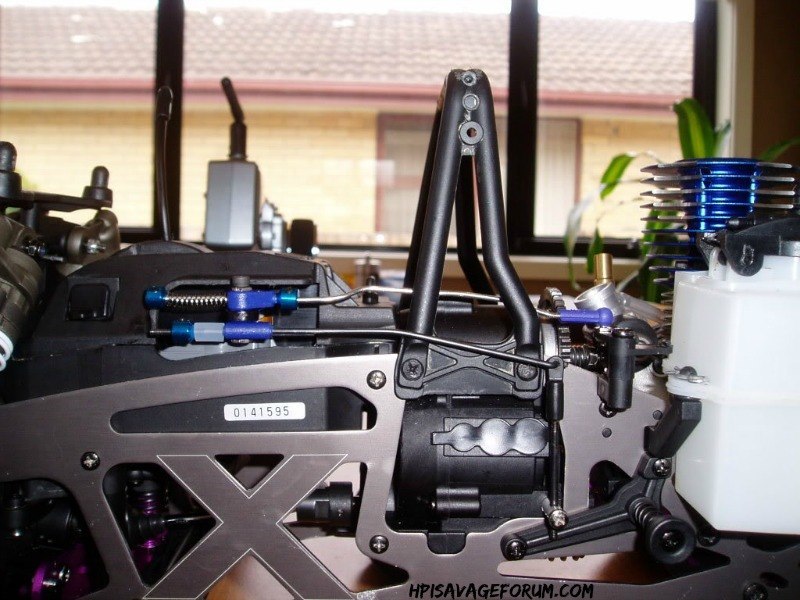
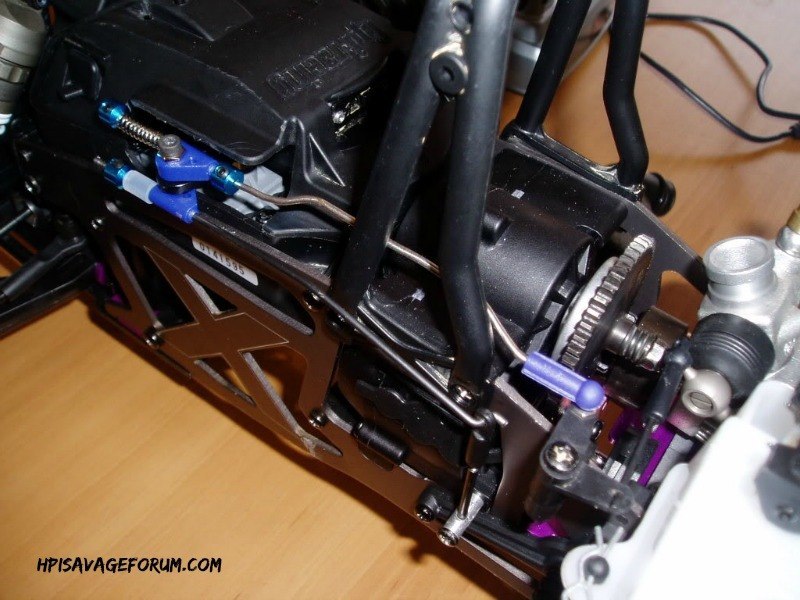
Slide you new throttle rod through the top servo horn and attach the Blue OFNA ball end connector to the Silver OFNA ball end you installed on your throttle mixer. Finish off with the throttle spring and another OFNA metal stop once it is actually in the slider. Also connect the existing HPI carb link to the throttle mixer and carb slide.
See below for the install and finished linkage.
I know this has been done to death by everyone, but I still thought it would be worth posting up how my set up was done and how it all went together.
This install has been done on my Savage X RTR with OS 30VG.
WHAT YOU NEED TO BUY
- 1 x OFNA Linkage Kit (P/N #10724)
- 1 x OFNA Linkage Sliders (P/N #10704)
- 1 x OFNA Heavy Duty Servo Horn Kit (P/N #30661)
THE STOCK HPI ITEMS YOU WILL RE-USE
- Stock HPI Brake Rod (long)
- Stock HPI Brake Rod (short)
- Stock HPI Throttle Mixer
- Stock HPI Carb Link (mixer to carb)

STEP 1 - REMOVE EXISTING LINKAGE SET UP
The first thing you want to do is remove the existing throttle and brake linkage set up. This will include the servo horn, linkages, springs, throttle mixer etc.
Once you have removed all these items you should end up with the following bits and pieces off your truck.

STEP 2 - PREPARE THE NEW GEAR FOR INSTALL
The next thing you want to do guys is prepare all the new items, as well as some old items from the original linkage set up for install.
I find that by laying everything out will help you visualize what you need and where it will all end up going.
You are going to have to bend the supplied OFNA threaded rod to a similar shape as the existing HPI throttle arm. Once you get it close, leave it for the moment, as once you install it you may find you need to change the shape a bit to suit.
Get the small silver OFNA ball end and nut and attach it to the throttle mixer. This is what the Blue OFNA ball connector and threaded rod will connect too.
Thread the Blue OFNA ball connection onto the the throttle rod too.
Get your existing HPI brake rod and put a small bend in it about half way between where the servo is and where it connects to the gearbox rod, this just helps it move freely. This bend only needs to be small.
You are also going to have to bolt the sliders that come with the kit to the servo horn. Use the long single bolt supplied, not the two small ones and connect BOTH Sliders to the OUTSIDE hole on the Servo Horn.
Here are some photos of the above items.


** Please note the the top throttle slider on the below image was moved to the outer hole (as per described above) for a better fit and clearance. See the installed photos for reference.

STEP 3 - INSTALL IT ALL ONTO THE TRUCK
Now the fun part, you get to fit it all onto the truck.
The first thing you need to do is get a small, maybe half inch round file and just file a small half circle into the radio box lid where the throttle rod ends. This gives just a little more clearance. Please see the installed photos for more details on where and how big this filed area is (not big at all and not noticeable).
Start by re-fitting the throttle mixer to the plastic bracket on the TVP.
Then attach your servo horn to the servo.
Attach the existing HPI brake rod assembly to the brake mount on the side of the gearbox and slide the rod through the lower slider on the servo horn. Instead of re using the HPI brake knob and spring, I opted for the OFNA metal end and a small piece of fuel tube - this will give a much more responsive and firm brake feel.
Make sure you have a Blue OFNA metal stop on the throttle rod BEFORE you slide it onto the slider.
Slide you new throttle rod through the top servo horn and attach the Blue OFNA ball end connector to the Silver OFNA ball end you installed on your throttle mixer. Finish off with the throttle spring and another OFNA metal stop once it is actually in the slider. Also connect the existing HPI carb link to the throttle mixer and carb slide.
See below for the install and finished linkage.


