Help!!Will this work in my Savage21 ?!

This site may earn a commission from merchant affiliate
links, including eBay, Amazon, and others.

Orgnl21beest

Member
Messages
39
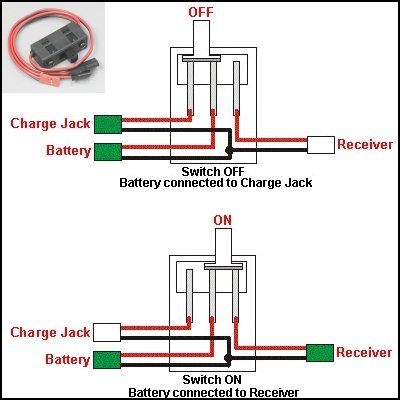
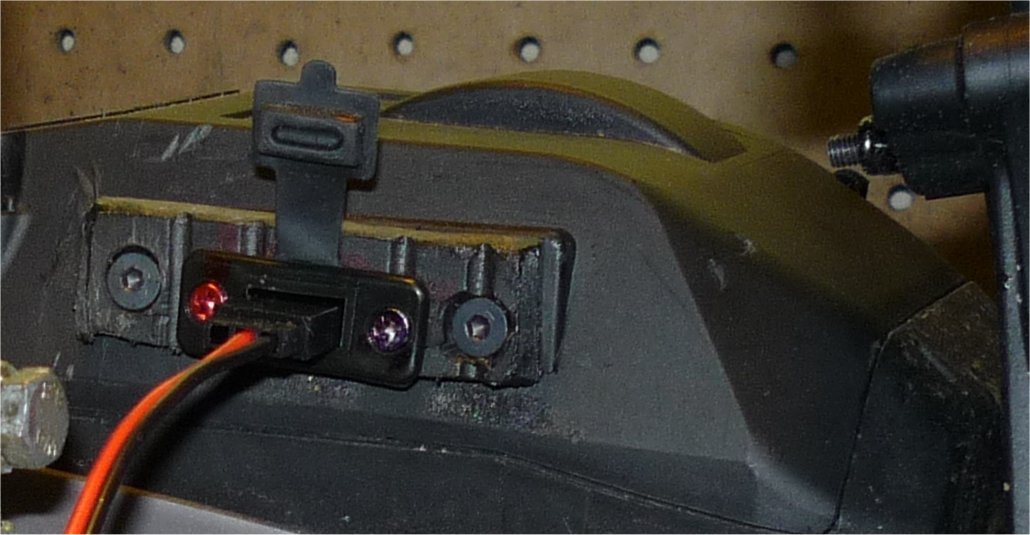
So I Just bought one of these Venom1600 battery packs from my local hobby shop, the guy knows I have a original Savage21 , he said it would work .. but the plug in from the battery pack to the receiver is different .. does this plug right into receiver itself ?! Or .. will this not work with my truck and I have to return it

Thank You
 

Attachments

  • A0D1E30A-1FEB-48B6-985F-ACF1A78FA02C.png
    A0D1E30A-1FEB-48B6-985F-ACF1A78FA02C.png
    563.1 KB · Views: 3
The battery plug should fit the receiver, what are you comparing it to? The servo plugs should be the same as the battery plug. Sometimes the plug may have a slightly thicker edge on one side, called Futaba plug, so just trim it down if there is no corresponding slot in the receiver.
 
The battery plug should fit the receiver, what are you comparing it to? The servo plugs should be the same as the battery plug. Sometimes the plug may have a slightly thicker edge on one side, called Futaba plug, so just trim it down if there is no corresponding slot in the receiver.
I see how A looks like it should plug right into C .. is that correct ? If so what happens with plug B then .. I just assumed you had to use the same plug that the stock AA battery holder plugged into

So does plug A plug into where the B is on the receiver .. if so do I just Tuck away Plug B somewhere (Plug B in my diagram.?)
Thank you
E1EBA8EC-CC47-42CB-9D78-D47BCE0A6C9C.jpeg
 
Post a pic of the reciever.
I started tinkering lol UTT oh haha! I took the 2 small philips head screws out of the power switch ,and I see that it’s all connected .. if I use this new battery kit how do I turn it off everytime .?! Just keep it unplugged when not in use ? (If this new battery does in fact plug right into where the “B” is on the receiver ..)
 
I started tinkering lol UTT oh haha! I took the 2 small philips head screws out of the power switch ,and I see that it’s all connected .. if I use this new battery kit how do I turn it off everytime .?! Just keep it unplugged when not in use ? (If this new battery does in fact plug right into where the “B” is on the receiver ..)
 
I got it figured out fellas! I took the on off switch off, and pulled the plug out of B on the receiver and plugged the new battery in to B slot on receiver , turned my controller on and everything works as it should thank you everybody for your help I didn’t want to just start tinkering too much before I asked on here in case Id of broke something

I guess sometimes you just Gotta send it!🤣
 
I guess my last question to you guys is when I’m not using it, do I have to unplug it ? or since the remote will be off can I just let it plugged into the receiver, and it won’t draw power..?
 
Your on/off switch has JST connectors, the battery image shows a servo type connector. Therefore either change the battery to a female JST or on/off switch to female servo type. Some batteries come with both JST and servo connectors. Not sure what your solution was but if the on/off switch works then you can leave the battery installed.
 
Your on/off switch has JST connectors, the battery image shows a servo type connector. Therefore either change the battery to a female JST or on/off switch to female servo type. Some batteries come with both JST and servo connectors. Not sure what your solution was but if the on/off switch works then you can leave the battery installed.
I simply removed the on/off switch all together and plugged the connector into the servo !
 
I simply removed the on/off switch all together and plugged the connector into the servo !
That's going to be fun every time you have to shut off the truck...

Before I had a plethera of connectors on hand, I just cut the 3rd blank pin off the battery connector with dykes, sanded it down smooth then jammed it into the jst connector. Not that big of a deal to do, just cut it and sand it, 5 minutes and then you can use the switch again.

If you don't have one, get a switch with a charge lead, then you can have that hang out somewhere safe and charge without messing with the receiver box at all.
https://www.amazon.com/ShareGoo-Switchs-Receiver-Airplane-Helicopter/dp/B07KYC28G8

Or get a spare male end and solder it to the other side of the switch you have if it doesn't have one. Then you can just use it. Like these, then cut the end off you don't need:
https://www.amazon.com/HONBAY-Remote-Control-Extension-Airplanes/dp/B01LA9YDEI

2021-0408-RC_Switch_with_Charge_Lead-diagram.jpg
I’ve never kept the receiver cover on my truck , so other than removing the body and pulling the plug out it’s not really a big deal ! :)
 
image.jpgimage.jpgGot the motor back with the heat sink head screw re-drilled ,cleaned the truck up a bit more , now just need air filter element ,since my other one the mice got to and was dry rotted ! One step closer!!
 
I’ve never kept the receiver cover on my truck , so other than removing the body and pulling the plug out it’s not really a big deal ! :)
Yep, that makes it easier for sure!

I have mine with the lid on it and the receiver in a ziptied balloon to keep water from getting to it. I also have the battery pack in a ziptied balloon for the same reason. I run in wet conditions a lot, so I do that with all my trucks. Having an external charge port makes life easier.
2012-1223-SavageChargeJack.jpg


I don't have a nitro savage anymore, but that was on my X when I did have it.
 
So what is stopping your 5 cell batt pack from flying out of your battery box when jumping and bashing ?
I haven’t ran it yet , I’ve just been getting everything back together after 9 years of it sitting , but the hump pack seems pretty dang snug underneath the receiver tray or what not .. I wouldn’t want the pack to be any bigger .. I never had any issue with the 4AA battery pack either that came with the truck !
 
Yep, that makes it easier for sure!

I have mine with the lid on it and the receiver in a ziptied balloon to keep water from getting to it. I also have the battery pack in a ziptied balloon for the same reason. I run in wet conditions a lot, so I do that with all my trucks. Having an external charge port makes life easier.
2012-1223-SavageChargeJack.jpg


I don't have a nitro savage anymore, but that was on my X when I did have it.
That’s some Awesome DIY Ingenuity there ! That makes sense with running around wet areas etc. if I ran mine in creeks and puddles etc I’d definitely reconsider not using the cover! But I honestly am pretty reserved with mine , I stick to baseball fields and old coal track beds and big parking lots for the most part :)
 
I haven’t ran it yet , I’ve just been getting everything back together after 9 years of it sitting , but the hump pack seems pretty dang snug underneath the receiver tray or what not .. I wouldn’t want the pack to be any bigger .. I never had any issue with the 4AA battery pack either that came with the truck !
My truck made it up hill climbs that most 4 wheelers wouldn’t even attempt , still have trouble believing it to this day lol
 
Another waterproofing trick is to seal up your servo cases with RTV sealant. And dab grease around the splined servo output shaft. Heres a pic from back in 2006 when i had my Savage 25 set up for bashing out on the winter pond ice.

View attachment 8687
Never had the best luck with that. Tried balloons, plastidip, o-ring under the servo horn, grease around the output shaft, etc. They all died due to water at some point. So glad that waterproof servo's can be found all over these days and are relatively cheap. I won't even buy a servo that's not waterproof anymore.

I used to run nitro in snow quite a bit...
2005-0105-SavageSnowTopBody.JPG

2005-1204-RevoSnowDayTop.jpg


Now I run them a couple times a year in the summer.
 
My biggest problem with water ingestion was not the electronics, I had them sealed up pretty well. My problem was water getting into the tires and soaking the inner foams then freezing then the foams would take forever to dry and the foam would bunch up and cause a major imbalance and I would get nasty wheel hop.
 
I combat that by venting my tires. When running in wet conditions, every so often, I'll slowly accelerate to top speed in a dry spot to wring the water out. I've been venting my tires for 15+ years due to that.

At the end of the bash, I'll do that to wring them out a few times before putting the truck away.
Thats a cool idea, never thought of that. After I ruined a set of tires from water, the second set I RTV sealed the tire beads very well, I actually also RTV sealed the inner rim vent holes and that was WAY better. After the second winter of bashing I stopped. The fun factor wore off, and the problems were just not worth the hassles. Winters were then designated for rebuilds.
 
That's what brushless trucks are for. ;)
Yea I know. I just have a poor attitude towards electric in generall. I always tout the awesome "realism" with nitro , but as of recent i've been watching local live stream indoor racing of electric 1/8 buggy and admittedly they look SO cool ! Back in 2004 brushless was brand new and still in it's infancy and had it's problems but technology has takes leaps and bounds at present day and it's tough to ignore now. Guess it's time to change my attitude towards electric.
 
Last edited:
Yea I know. I just have a poor attitude towards electric in generall. I always tout the awesome "realism" with nitro , but as of recent i've been watching local live stream indoor racing of electric 1/8 buggy and admittedly they look SO cool ! Back in 2004 brushless was brand new and still in it's infancy and had it's problems but technology has takes leaps and bounds at present day and it's tough to ignore now. Guess it's time to change my attitude towards electric.
While brushless is easier, it's not idiot proof. Easy to damage things if you don't have a decent idea as to what your doing. The power you have on tap is a bit intoxicating at times.

I was of the same mindset as you until I finally caved and got one. At one point, I had 10 or 11 nitro bashers. Now I have 2 nitro's that sit on the shelf and 5 brushless that I cycle through every weekend.
 

Latest posts

Members online

Back
Top