Dark Mantis
Member
- Messages
- 19
- Location
- Pensacola, Florida
Hi All
My Wife Just Got Me A Grave Robber Body, But She Wants An "Over The Top Body" Not Just A Bashing Lid.
So I Will Post This As I Go.
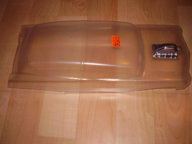
This Is How I Start My Body. I Cut The Mold Extra Off "Not Finished In This Pic" Before I Paint.
I Have Put A Bad, "No Chance At A Fix" Scratch In A Body Before Trying To Trim It And I Will NEVER Do That Again.
Plus I Will Need Some Of The Cut Off For Other Things; Tail Light Buckets, Head Light Backing And Evan Working Pop Up Head Lights. No Pop Up On This Body It's Not A Toyota Mr2!
I Know We Are Told To Paint Dark To Light But Some Times That Just Will Not Do.
As You Can See I Painted The Blower/Engine Chrome Already And I Must Do The Other Chrome Before I Start Any Other Paint. You Will Understand Why In Later Pics.
Part Of The "More" Will Be Lights. Not Just LED's Shoved Into A Hole Drilled Into The Body.
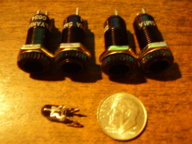
The Front Lights Will Live Inside Buckets. I Do Not Want Any Side Or Under Car Light Of The Wrong Color To Shin To A Place I Do Not Want.
The Grave Robber Is Of A 59/60 Cadillac Wagon So Round In The Front They Must Be. Not Just Two Lights But Four.
The Back Lights Would Have Been Nothing To Do If The Body Was A True 59. Two Red Bullet
LED's And Done But No Such Luck. Square Or Round! NO! Some Odd Ball, Not Square, Nut Job Shape. Looks Like I Will Need To Make A To Fit Box For Each Side.
For The Front I Have Some Sockets That I Think Will Fit The Build Just Fine After A Small Amount Of Love.
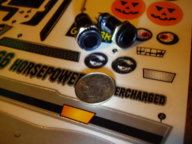
They Look To Be Close To The Right Size For A Quad Headlight Setup.
Something I Always Do On An "Over The Top" Or "For Big Money" Build Is, I Will Make Two Of Things. The Reason For This Is If I Make Two And I Mess One Up I Do Not Have To Start From The Beginning, Also Doing Things Two Times In A Row Is Not As Hard As Doing Things Over Latter. Rework Is A Downer. Plus A Lot of The Time I End Up With Two!
Now I Did Say This Will Be An "Over The Top" Build?
I Need To Go Over The Top Right!
For The Over The Top On The Headlights Part "Demon Lights" Comes To Mind.
Some Of You May And Some Of You May Not Know What Demon Lights Are.
Demon Lights On A Real, Full Size Car Have Red In The Center Of The Headlight.
So Will The Headlights On This Build!
That's Correct! Demon Lights On An RC Body!
I Think This Will Be A First.
I Did See Halo Lights But Not True Demon Lights On The Web.
That's All For Now.
Time For Me To Get To Work On Work I Love To Do So It Is Not Work At All!
My Wife Just Got Me A Grave Robber Body, But She Wants An "Over The Top Body" Not Just A Bashing Lid.
So I Will Post This As I Go.

This Is How I Start My Body. I Cut The Mold Extra Off "Not Finished In This Pic" Before I Paint.
I Have Put A Bad, "No Chance At A Fix" Scratch In A Body Before Trying To Trim It And I Will NEVER Do That Again.
Plus I Will Need Some Of The Cut Off For Other Things; Tail Light Buckets, Head Light Backing And Evan Working Pop Up Head Lights. No Pop Up On This Body It's Not A Toyota Mr2!
I Know We Are Told To Paint Dark To Light But Some Times That Just Will Not Do.
As You Can See I Painted The Blower/Engine Chrome Already And I Must Do The Other Chrome Before I Start Any Other Paint. You Will Understand Why In Later Pics.
Part Of The "More" Will Be Lights. Not Just LED's Shoved Into A Hole Drilled Into The Body.

The Front Lights Will Live Inside Buckets. I Do Not Want Any Side Or Under Car Light Of The Wrong Color To Shin To A Place I Do Not Want.
The Grave Robber Is Of A 59/60 Cadillac Wagon So Round In The Front They Must Be. Not Just Two Lights But Four.
The Back Lights Would Have Been Nothing To Do If The Body Was A True 59. Two Red Bullet
LED's And Done But No Such Luck. Square Or Round! NO! Some Odd Ball, Not Square, Nut Job Shape. Looks Like I Will Need To Make A To Fit Box For Each Side.
For The Front I Have Some Sockets That I Think Will Fit The Build Just Fine After A Small Amount Of Love.

They Look To Be Close To The Right Size For A Quad Headlight Setup.
Something I Always Do On An "Over The Top" Or "For Big Money" Build Is, I Will Make Two Of Things. The Reason For This Is If I Make Two And I Mess One Up I Do Not Have To Start From The Beginning, Also Doing Things Two Times In A Row Is Not As Hard As Doing Things Over Latter. Rework Is A Downer. Plus A Lot of The Time I End Up With Two!
Now I Did Say This Will Be An "Over The Top" Build?
I Need To Go Over The Top Right!
For The Over The Top On The Headlights Part "Demon Lights" Comes To Mind.
Some Of You May And Some Of You May Not Know What Demon Lights Are.
Demon Lights On A Real, Full Size Car Have Red In The Center Of The Headlight.
So Will The Headlights On This Build!
That's Correct! Demon Lights On An RC Body!
I Think This Will Be A First.
I Did See Halo Lights But Not True Demon Lights On The Web.
That's All For Now.
Time For Me To Get To Work On Work I Love To Do So It Is Not Work At All!
Last edited:
