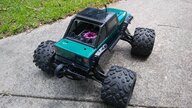
It was like watching Monster Jam Free StyleIt looked like a good ramp!
Navigation
Install the app
How to install the app on iOS
Follow along with the video below to see how to install our site as a web app on your home screen.
Note: This feature may not be available in some browsers.
More options
-
Ask questions. Share your HPI Savage knowledge. Register TODAY!
You are using an out of date browser. It may not display this or other websites correctly.
You should upgrade or use an alternative browser.
You should upgrade or use an alternative browser.
What did you do to your HPI Savage today?
- Thread starter SAVYDUNBROKE
- Start date
This site may earn a commission from merchant affiliate
links, including eBay, Amazon, and others.
links, including eBay, Amazon, and others.
mechrome
Member
- Messages
- 5
- Location
- New Jersey
Scooter
Member
- Messages
- 38
- Location
- Connecticut
Just looked at them and decided to bash with my Kraton because they were all so clean
InTheZone
Active Member
- Messages
- 76
I haven't used my Savage X in around 12-13 years, but here are parts I have ordered and will be installing once they arrive:
-HPI Super HD Dogbones
-HPI Super HD Diff Shaft
-HPI Extended Axles
-HPI Machined 29t Diffs
-HPI Machined 9t Bevel Gears
-HPI Fiberglass brakes (currently have metal)
-Robinson Racing 47t Gen3 Steel Spur
-Robinson Racing 17t Hardened Clutch Bell
-HPI Ceramic Slipper Pads
-HPI Sway Bar Set (found this at my only local hobby store after going through every parts bin they had)
I'm still waiting for my new Futaba radio to come in, but I'll be re-using my old Hitec servos until those go bad. Also waiting for LRP to restock their .32 Spec 4 with pull start. The only part I cannot find is the high speed 3rd gear set PN 77065, even tried looking for Savage XL 5.9 transmissions that someone might be parting out but no luck. And I have other small things coming in like o-rings and shims for the diffs. I still need to remove my broken S25 motor to see if I ever upgraded to a 3 shoe flywheel, if not I'll be ordering one of those as well. Pictures will come soon with a before and after installation. Can't wait!
InTheZone
Active Member
- Messages
- 76
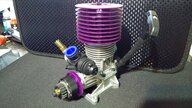
Ordered a novarossi 28-8 pullstart engine. Was on sale at novarossi direct and since lrp has been ignoring me on email and Facebook (I signed up mainly to ask them about their engines) I did some research and went novarossi instead since they were in stock.
Also went ahead and took apart the savage for the first time this decade. My first issue was removing a 17mm wheel nut, had to take a dremel to cut it off without damaging the wheel. I did cut into the 17mm hex adapter so I had to find some replacements on eBay. I thought the wheel was stripped but the issue was that the wheel was slightly loose off the hub so the 17mm nut was spinning with the axle when trying to loosen it up.
Got the broken engine removed, rrp steel spur gear out (I think it has 52 teeth), cleaned up my integy motor mount, ordered a savage xl engine plate, and have the rear bulkhead and dogbones removed. My tsais pipe and header look good, as does my fuel tank but the air filter foam looks like trash along with the fuel lines.
I'd like to install the new fiber brakes, RRP Gen3 slipper, extended axles, SHD dogbones, and bullet proof diffs today. Still need to swap out battery pack and receiver as well. Hoping to have it all completed before the engine arrives.


InTheZone
Active Member
- Messages
- 76
-Go on photobucket and get a Direct Link (or right click the picture, save image address)Not workin.....i can't figure it out.
-Go here in the comment box, click insert image next to the smiley face
-Insert link (right click, paste)
If you click preview and see your picture you know you did it right, just post reply after preview and we should see it.
InTheZone
Active Member
- Messages
- 76
So with my Savage SS torn down, only the transmission and radio box are mounted in the X TVPs, I attempted to install my Robinson Racing Products Gen3 Slipper, new HPI dual fiberglass brakes, and my Novarossi 28-8 with mugen 1.0 springs and dynamite max life aluminum clutch shoes.
The new slipper pads I bought are useless, because the Gen3 kit comes with it's own plate, super thick slipper pad, spur gear and bearing. I just used a single hex washer, spring, and nut from the original assembly. Does anyone know if this slipper uses the same recommended adjustment (tighten nut all the way, then back off half a turn)
Now onto the engine. I have a 3 piece integy motor mount and it apparently is too narrow for the .28 engine to fit. I tried to loosen the bolts that hold the little vertical mounts so that I can possibly widen it up, while that did work they must sit at an angle because one side of the engine doesn't line up with the holes in the mount. So i ordered a standard HPI engine mount that works with all size motors.
With that issue I went to install my RRP 3 shoe vented flywheel and clutch and ran into another snag. The indentation of the pilot nut is too low, so the first clutch spring I went to install was angled about 45 degrees and I feel I may have either fatigued the spring or bent it by trying to angle it so far to rest on the pilot nut so I ordered another set of 1.0 springs and a mugen clutch nut, and shims for a SG crankshaft. Every single one of my washers is either too small or too large for the I.D. section to sit center on the crankshaft.
I also have a new XL engine plate as I was running the old 2mm purple plate, a new RRP hardened 17T clutch bell. During this down time waiting for more parts I'll end up disassembling my freshly rebuilt BP diffs to remove some shims and test fitment so that the mesh with the pinion isn't binding. Right now the diff sits perfectly snug in the bulkhead, but it may be too centered and is causing a slight bind on the pinion. I have tried a pinion with and without a shim behind it. If anything I'll remove a shim or two on the ring side of the diff (I have 3 on the ring side and 3 on the case side) and test fitment with a pinion installed.
And I can start putting the ends of the chassis back together after that. I still need to rebuild the shocks, just for safe measures because some shocks compress differently and don't sit at the same length with no load. New hybrid bearings will also be going in every hub and bulkhead.
Last edited:
- Messages
- 2,627
- Location
- Dekalb, IL 60115
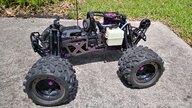
Installed extended super duty axle stubs and modified 17mm wheel hubs to install the set of 3.8" trenchers I had from my e-revo as it just can't live with those tires on it. Now my X and my FluxHP run the same setup:


I have 16/47 gearing on it at the moment. I was running 17/47 with smaller traxxas maxx 3.3 tires/wheels on it. I geared it down for those tires... thinking I might want to go to 15/47 just to avoid cooking the clutch with these. Meh, will probably sit on the shelf all summer anyway. lol!
I have 16/47 gearing on it at the moment. I was running 17/47 with smaller traxxas maxx 3.3 tires/wheels on it. I geared it down for those tires... thinking I might want to go to 15/47 just to avoid cooking the clutch with these. Meh, will probably sit on the shelf all summer anyway. lol!
InTheZone
Active Member
- Messages
- 76
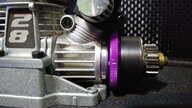
Got my clutch shim kit, mugen pilot bearing, mugen 1.0 springs, and motor mount in. Proceeded to install everything and the clutch springs sat perfectly on the new pilot nut.
After installing shims, ceramic bearings, and the clutch screw I noticed I had an unfamiliar amount of play in the RRP 17T hardened clutch bell. Side to side was good, but the clutch bell had a lot of play in other directions as well. As I was spinning the clutch bell I could see the bearings weren't moving most of the time, the hole in the clutch bell was slightly too large. Luckily for me I had my old 17T vented clutch bell with minimum wear on the inside so I threw that on.
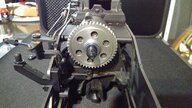
Got the engine mount installed and the carb flipped in the right orientation. Also here's the beefy RRP Gen3 47T slipper installed. Currently I'm working on adjusting the shims in my BP diffs. There's too much notchiness on the ring and pinion, going to remove a shim from the ring side of the diff and test for mesh.
After installing shims, ceramic bearings, and the clutch screw I noticed I had an unfamiliar amount of play in the RRP 17T hardened clutch bell. Side to side was good, but the clutch bell had a lot of play in other directions as well. As I was spinning the clutch bell I could see the bearings weren't moving most of the time, the hole in the clutch bell was slightly too large. Luckily for me I had my old 17T vented clutch bell with minimum wear on the inside so I threw that on.
Got the engine mount installed and the carb flipped in the right orientation. Also here's the beefy RRP Gen3 47T slipper installed. Currently I'm working on adjusting the shims in my BP diffs. There's too much notchiness on the ring and pinion, going to remove a shim from the ring side of the diff and test for mesh.
Attachments
- Messages
- 4,790
Only wrong thing I see is you are using that heavy brass bushing at the end of the bell, that alone will wear the bearings quickly, I was told by Mickey a long time ago to substitute a piece of fuel tube in place of it, so I did as he said and it actually works very well.....


InTheZone
Active Member
- Messages
- 76
I have the smaller bushing the XL uses as well. Should I use that or fuel tubing like you suggested?Only wrong thing I see is you are using that heavy brass bushing at the end of the bell, that alone will wear the bearings quickly, I was told by Mickey a long time ago to substitute a piece of fuel tube in place of it, so I did as he said and it actually works very well.....
- Messages
- 2,627
- Location
- Dekalb, IL 60115
If it's shimmed properly and the bushing is small enough to only touch the inner race of the bearing, it really doesn't matter what you use. I tend to use traxxas teflon shims/washers to take up most of a gap, then typicaly stainless steel shims to get it where I want it.
NitroNick
Active Member
- Messages
- 96
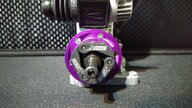
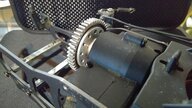
InTheZone, you have a sick setup going on there, but I do see an issue with it, at least as far as I can tell. I am planning on running the same engine with a similar clutch. However, with that vented bell and the RR metal spur, I am pretty sure they will rub when you go to install the engine. (because the vented bell has an extra few mm on the front, you can see what I mean in your second pic). Because of this I was planning on having to run the HPI metal spur gear since it is much thinner than the stock plastic or RR spur. Could be wrong but let me know.
InTheZone
Active Member
- Messages
- 76
More pics to come soon. I have the engine installed right now and will swap out the slightly used vented bell with a brand new hardened HPI bell. There's about a 3mm gap between the face of RRP Gen3 Spur and face of the Vented Clutch bell.InTheZone, you have a sick setup going on there, but I do see an issue with it, at least as far as I can tell. I am planning on running the same engine with a similar clutch. However, with that vented bell and the RR metal spur, I am pretty sure they will rub when you go to install the engine. (because the vented bell has an extra few mm on the front, you can see what I mean in your second pic). Because of this I was planning on having to run the HPI metal spur gear since it is much thinner than the stock plastic or RR spur. Could be wrong but let me know.
Last edited:
- Messages
- 4,790
More pics to come soon. I have the engine installed right now and will swap out the slightly used vented bell with a brand new HPI bell. There's about a 3mm gap between the face of RRP Gen3 Spur and face of the Vented Clutch bell.
One thing to keep in mind when using a different clutch bell is to make sure it is hardened so that spur doesn't eat the bell gear...
- Messages
- 2,627
- Location
- Dekalb, IL 60115
Yep... been there. 1/2 tank of fuel after installing the RC Solutions tool steel spur into my big block t-maxx 15 years ago. Just used whatever 1M bell I had at the time... made for a pretty spark show. lol!One thing to keep in mind when using a different clutch bell is to make sure it is hardened so that spur doesn't eat the bell gear...

jssouthtx
Well-Known Member
- Messages
- 149
- Location
- New Braunfels TX
I added the FLM tierods and finished buttoning up the electronics. Just using all the oe stuff for now as is still works great.


InTheZone
Active Member
- Messages
- 76
Looks nice, let me know how the suspension (shocks and arms) holds up.I added the FLM tierods and finished buttoning up the electronics. Just using all the oe stuff for now as is still works great.
View attachment 6557View attachment 6558View attachment 6560
NitroNick
Active Member
- Messages
- 96
Yesterday I made a video on everything I have done to my truck thus far and I really like the way it is coming out.
Here is the link:
Things I did that I didnt mention are Savage Flux diff cases and turnbuckles and going from aluminum to plastic stock shock towers.
Video is a bit over 20m long haha so if you do watch I'd suggest watching at 1.25 speed. Let me know what you think!
Here is the link:
Things I did that I didnt mention are Savage Flux diff cases and turnbuckles and going from aluminum to plastic stock shock towers.
Video is a bit over 20m long haha so if you do watch I'd suggest watching at 1.25 speed. Let me know what you think!
jssouthtx
Well-Known Member
- Messages
- 149
- Location
- New Braunfels TX
I’ll definitely do that once it’s broken in and I can get some bashing done. I got a question tho regarding your nitro build. What Size spur and bell are you using. Mine currently has a 16t bell and 52T spur and absolutely zero chance of fitting in this chassisLooks nice, let me know how the suspension (shocks and arms) holds up.

InTheZone
Active Member
- Messages
- 76
Before my rebuild I was running an Integy Motor Mount, original style RRP 52T steel spur and either a 15 or 17T vented clutch bell (can't remember because I have both in my parts tray)I’ll definitely do that once it’s broken in and I can get some bashing done. I got a question tho regarding your nitro build. What Size spur and bell are you using. Mine currently has a 16t bell and 52T spur and absolutely zero chance of fitting in this chassis
View attachment 6570
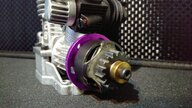
Currently I have installed:
-Stock HPI engine mount - PN HPI 86060
-RRP Hardened Clutch Bell / HPI Heavy Duty 17T Clutch Bell - PN RRP 7017. Be aware of the RRP clutch bells. The first was so loose over the bearing that when you spun the bell the bearing sometimes didn't spin with it. I got a replacement and it also sat a tad loose, but the bearing always spun with the clutch bell so kept it. I have a HPI 17T on the way as I've never had an issue with fitment with those.
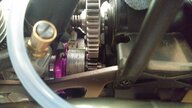
-RRP Gen3 47T Spur - PN RRP 7347
I have the engine mount slid over almost all the way to the right/passenger side of the engine plate. Spur mesh is perfect. In case you didn't know, make sure the engine mount is square with the engine plate. It's easy to set mesh with the engine at a slight angle which might lead to extra wear on the clutch bell teeth. You can see from my picture the gap between the edge of the mount and plate is perfectly parallel and not at an angle.
Attachments
Last edited:
InTheZone
Active Member
- Messages
- 76
Alright guys, the truck is right now drivable, although not 100% complete. There is one more part on the way to give me some piece of mind for the long term, even though I should probably order some spare replacements for the original, see below.
While I was rebuilding my original SS shocks with black springs I did not realize how poor their condition was until after I rebuilt all of them. The shocks feel 100x better where before it felt like the truck may bottom out if you drop it from a few feet. When testing compression and rebound I felt one of the shocks get soft after compressing it once. Trying to figure what it was I noticed oil on the body. So I'm thinking it's the cap, somehow it didn't seal right....nope that's dry. I top it off with more fluid and wipe the body dry and compress it once more. I can see down the center line where the two halves of the shock body meet, there's a a square imprint on the body, like it was part of the mold process and fluid is slowly coming from that area. You can't see a hole, but it leaks. Luckily for me I had bought a spare shock body kit so I quickly fixed that issue.
I went ahead and ordered some aluminum big bore dual spring rate shocks from X Spede. They have aluminum caps and it appears to be aluminum bottom mounts as well. I'm still debating if I should order some more original shock bodies for the plastic shocks if I ever revert back to this setup. The plastic bodies are about 15+ years old, or whenever the original HPI Savage SS came out. Currently they have all new o-rings and I filled them with my old unused bottle of HPI 30WT shock oil. The stock oil had to be 10 or 20wt, was super soft compared to the 30. Originally I thought the X Spede shocks were priced cheaply, but then I realized the price of $35 was for one pair, not a complete set, so my expectations are that they should be pretty stout, and they'll be here in a couple of days. BTW this was the first time I ever rebuilt a shock and these shocks probably had around 2-3 years of use and never being touched.
As for my air filter I believe it's an old motorsaver filter. The old outside foam had deteriorated so bad that you could touch it and chunks would come off. One thing I didn't like is that the top of the filter is just a screen mesh with a hole inside the housing. There's an oiled cylindrical shaped filter on the inside of the mesh, but it has hole running down the center, where it looks to need a solid cylindrical filter instead so that dirt can't just freely make it's way into the engine. I'm not sure why I ran this setup or didn't think of this issue possibly ruining the engine when I was a kid, but it's fixed now. I have an HPI Savage Filter on the way with a proper top hat to block that open port of the filter. For now though I took a spare inner foam element and cut it into a circle to cover the opening at the top. You can see in the pictures everything fit perfectly and the engine is now properly protected.
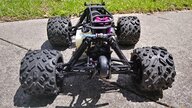
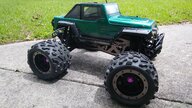
And to mount the wheels I installed the Hot Racing 17mm Adapters. I was worried with the +5mm offset it would be too wide with the extended axles, but I think it looks great with the Big Joe Tires. These tires are also 15+ years old, but the rubber feels as elastic as they should be and I don't see any cracking or tears anywhere.
So the only thing left to do is install the Sway Bars, test the new receiver and make sure my old servos still work (they should) and break in the 28-8 motor (preheat engine first to minimize wear on the rod). Here's some pictures of the first R/C I've built since I've been out...and it's my first hobby-grade electric, Xray T4 2019. And here's pictures of my Savage with my old HPI Jeep body, which has been undercoated with Goo All or something like it to help with durability for the body itself and the paint.
While I was rebuilding my original SS shocks with black springs I did not realize how poor their condition was until after I rebuilt all of them. The shocks feel 100x better where before it felt like the truck may bottom out if you drop it from a few feet. When testing compression and rebound I felt one of the shocks get soft after compressing it once. Trying to figure what it was I noticed oil on the body. So I'm thinking it's the cap, somehow it didn't seal right....nope that's dry. I top it off with more fluid and wipe the body dry and compress it once more. I can see down the center line where the two halves of the shock body meet, there's a a square imprint on the body, like it was part of the mold process and fluid is slowly coming from that area. You can't see a hole, but it leaks. Luckily for me I had bought a spare shock body kit so I quickly fixed that issue.
I went ahead and ordered some aluminum big bore dual spring rate shocks from X Spede. They have aluminum caps and it appears to be aluminum bottom mounts as well. I'm still debating if I should order some more original shock bodies for the plastic shocks if I ever revert back to this setup. The plastic bodies are about 15+ years old, or whenever the original HPI Savage SS came out. Currently they have all new o-rings and I filled them with my old unused bottle of HPI 30WT shock oil. The stock oil had to be 10 or 20wt, was super soft compared to the 30. Originally I thought the X Spede shocks were priced cheaply, but then I realized the price of $35 was for one pair, not a complete set, so my expectations are that they should be pretty stout, and they'll be here in a couple of days. BTW this was the first time I ever rebuilt a shock and these shocks probably had around 2-3 years of use and never being touched.
As for my air filter I believe it's an old motorsaver filter. The old outside foam had deteriorated so bad that you could touch it and chunks would come off. One thing I didn't like is that the top of the filter is just a screen mesh with a hole inside the housing. There's an oiled cylindrical shaped filter on the inside of the mesh, but it has hole running down the center, where it looks to need a solid cylindrical filter instead so that dirt can't just freely make it's way into the engine. I'm not sure why I ran this setup or didn't think of this issue possibly ruining the engine when I was a kid, but it's fixed now. I have an HPI Savage Filter on the way with a proper top hat to block that open port of the filter. For now though I took a spare inner foam element and cut it into a circle to cover the opening at the top. You can see in the pictures everything fit perfectly and the engine is now properly protected.
And to mount the wheels I installed the Hot Racing 17mm Adapters. I was worried with the +5mm offset it would be too wide with the extended axles, but I think it looks great with the Big Joe Tires. These tires are also 15+ years old, but the rubber feels as elastic as they should be and I don't see any cracking or tears anywhere.
So the only thing left to do is install the Sway Bars, test the new receiver and make sure my old servos still work (they should) and break in the 28-8 motor (preheat engine first to minimize wear on the rod). Here's some pictures of the first R/C I've built since I've been out...and it's my first hobby-grade electric, Xray T4 2019. And here's pictures of my Savage with my old HPI Jeep body, which has been undercoated with Goo All or something like it to help with durability for the body itself and the paint.
Attachments
-
 20190428_121417_HDR.jpg559.2 KB · Views: 11
 -
 20190428_121453_HDR.jpg583.1 KB · Views: 11
 -
 20190428_121516_HDR.jpg559.8 KB · Views: 10
 -
 20190428_121603_HDR.jpg567.6 KB · Views: 11
 -
 20190428_130150.jpg493.3 KB · Views: 10
 -
 20190428_130125.jpg542.7 KB · Views: 10
 -
 20190428_130212_HDR.jpg383 KB · Views: 11
 -
 20190428_121741.jpg528.8 KB · Views: 11
 -
 20190428_121820.jpg308.9 KB · Views: 9
 -
 20190428_121835_HDR.jpg232.7 KB · Views: 10
InTheZone
Active Member
- Messages
- 76
Making progress! Started the Savage with the new Novarossi engine for the first time, broke it in for 2 tanks (preheated so no stress was on the pull start assembly or rod), ran it for a tank then let it cool down to about outside ambient temps. Started it again and ran it through one last tank....I forgot how much of a mess the exhaust makes, especially when it's sitting in one spot. This was the first time I ran a nitro engine since 2006, maybe even a year or two longer.
- Messages
- 2,627
- Location
- Dekalb, IL 60115
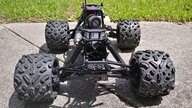
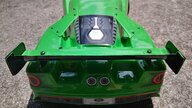
Installed a pair of full force RC carbon fiber brake disks:

Forgot how much of a pain it was to install brakes on the savage without removing the trans case.
Also changed the CB from 16T to 15T to help with the mass of the trencher 3.8's:

Had to raise the engine a bit so the CB didn't drag on the brake disks making it so I couldn't get good mesh:

Also made an ugly little mount/support for the t-bone rear bumper/skid to connect it to the rear skid "softly" so as to hopefully not break the screws off in the skid plate again that hold the stock bumper down. I also lost the plastic bit that keeps the t-bone wheelie bar from going in too far.

Forgot how much of a pain it was to install brakes on the savage without removing the trans case.
Also changed the CB from 16T to 15T to help with the mass of the trencher 3.8's:
Had to raise the engine a bit so the CB didn't drag on the brake disks making it so I couldn't get good mesh:
Also made an ugly little mount/support for the t-bone rear bumper/skid to connect it to the rear skid "softly" so as to hopefully not break the screws off in the skid plate again that hold the stock bumper down. I also lost the plastic bit that keeps the t-bone wheelie bar from going in too far.
InTheZone
Active Member
- Messages
- 76
How do those carbon fiber brakes compare to the red fiberglass? I wanted to stock up on some spare brakes and saw a bunch of these, but was worried the discs would glaze and the braking would then suffer.Installed a pair of full force RC carbon fiber brake disks:
Forgot how much of a pain it was to install brakes on the savage without removing the trans case.
Also changed the CB from 16T to 15T to help with the mass of the trencher 3.8's:
Had to raise the engine a bit so the CB didn't drag on the brake disks making it so I couldn't get good mesh:
Also made an ugly little mount/support for the t-bone rear bumper/skid to connect it to the rear skid "softly" so as to hopefully not break the screws off in the skid plate again that hold the stock bumper down. I also lost the plastic bit that keeps the t-bone wheelie bar from going in too far.
- Messages
- 2,627
- Location
- Dekalb, IL 60115
I ran a similar single disk on my aftershock back in the day when I had it. It came with dual steel disks and steel pads, which had a horrible binding issue once the disks wore a bit and would flop around on the trans cup. Then I got a CF disk (I think the from full force rc as well) and ran with that. With the single disk, it didn't bite as hard, but it worked fine even over time as I ran it. With the savage, I figured I'd try and fit 2 of them, then I get a bit more bite without taxing the servo so much.How do those carbon fiber brakes compare to the red fiberglass? I wanted to stock up on some spare brakes and saw a bunch of these, but was worried the discs would glaze and the braking would then suffer.
I doubt I'll run the savage much... but from running this similar disk before, it did work well.
InTheZone
Active Member
- Messages
- 76
So today I decided to get the tuning down after breaking it in a couple of days ago and I was having some serious issues with getting the truck up to speed when it was on the ground. At first I thought my shift points were jacked up or something was seized regarding the shift points seeing how old the transmission is.
Trying to tune top end it just sounded like WOT in 1st and I was moving at probably 10mph. Keep in mind I'm using a new RRP Gen 3 Spur and it has the most solid, beefy slipper pad you'll ever see. The instructions never said how much to adjust the nut so I set it to factory settings. Apparently that was way too loose. So I tighten a turn and the truck picks up better and I get more top end, but it still screams while not matching the speed it should be doing. in the end I had tightened it almost all the way down and as soon as I did my first pass down the driveway is when the truck came to life like I've never seen. It was popping wheelies with ease and it was easy to control the wheelie, instantaneous response. One time I flipped it on the backside and it had enough momentum to bounce it back right side up and keep going.
Tuning the HSN was a breeze, it was just a matter of getting the engine temps up to properly adjust the LSN and Idle, which there is still some adjustments to be made. I'm just glad the issue wasn't the transmission, although I do need to remove it to delay the 1st to 2nd gear shift point. It's shifting too early and not taking advantage of the powerband. I don't want it to rev out completely before shifting, but it needs to be close to that end rather than shifting after 2 seconds at 1/2 throttle. Once I get that sorted I'll mess with 3rd gear.
Gave myself a blister from the pullstart...I remember this now from years before all too clearly once it happened. I need to remove some of the heat shield from the fuel tubing so I can see it better for priming purposes. If it's not raining tomorrow I'll attempt to take it to a nearby track at a private mechanic shop.
btw I noticed my front and rear upper bulkhead braces can move around a little, I'm assuming this is normal although I feel it should be snug or at least designed that way.
Last edited:
- Messages
- 2,627
- Location
- Dekalb, IL 60115
Added a thin metal plate to the body under the hood so the gopro has a stronger support. Bound the receiver to my new transmitter. In doing so, I found that my throttle linkage left a bit to be desired. I'm not 100% sure I was getting full throttle last time out, which would help explain the difficulty tuning. I put the LRP30 back at a bit richer than factory and fixed my linkage. Hoping the grass bmx isn't a big mud puddle tomorrow. Got a lot of rain this past week.